Adobe buildings. How to build a house from adobe. Technology of manufacturing adobe bricks
Content:
- What adobe bricks are made of
- How adobe bricks are made — manufacturing technology
- Dimensions of finished adobe bricks and molds for them
- How to build adobe brick houses
- Foundation
- Strip foundations on non-porous soils
- Columnar foundations in heaving soils with deep groundwater
- Preparatory work during foundation construction
- Adobe brick walls
- Rules observed during the construction of adobe brick walls
- Again about adobe walls
Adobe bricks are an affordable building material and if the foundation, plinth, blind areas and wall cladding are competently made of it, then you will get a wonderful house. Villagers often build adobe premises for livestock and birds, sheds, summer kitchens, garages, and other buildings, replacing scarce wood and burnt bricks with fire-resistant and cheap local building materials.
Houses made of well-dried adobe bricks are as functional as those made of burnt ones, that is, they are durable, beautiful, and durable. The presence of large pores in adobe bricks allows the latter to retain heat well, while the walls of the adobe house «breathe», as a result of which normal humidity is maintained in the room. Such houses keep warm for a long time in winter, and on hot summer days they are cool. It may turn out that in the first year, when the adobe walls are not completely dry, the room will be damp, but in subsequent years the humidity will return to normal.
One of the main disadvantages of adobe bricks is their hygroscopicity, that is, the ability to absorb moisture. Therefore, adobe walls are trying to protect as thoroughly as possible from contact with moisture, for which they build a foundation and a basement with reliable waterproofing, the walls themselves are plastered or lined, wide blind areas are performed around the buildings and reliable roof overhangs are provided so that rain and snow do not fall on the walls.
What adobe bricks are made of
Adobe brick — raw brick, dried in the air, not burnt — is made of clay and sand with the addition of a 5...10-centimeter section of straw, flax or hemp firewood, chopped moss or other fibrous materials. Recall that the bonfire (bonfire, bonfire, bonfire) is waste («bark») formed in the process of flapping and carding flax and hemp. Usually, the adobe mass of the bonfire contains 8...10 times less than straw. Such herbal additives provide sufficient strength to the brick and reduce its thermal conductivity as a result of the formation of pores in it. Rural residents of the southern regions of the country add horse or cow manure to the adobe mass to increase its plasticity. The amount of fiber additives depends on the degree of fat content of the clay. So, for 1 m of adobe mass from greasy clay, an average of 14...15 kg of additives are taken, and in the case of medium-fat clay — 10...11 kg. Straw will completely replace the stems of field or forest horsetail, which, by the way, are stronger and stronger than it. The summer side branches of horsetail are easily separated from the stem, after which they are used as straw, and the stems will replace the bonfire after cutting. Interestingly, the branches and stems of horsetails are covered with a layer of silica, which increases their adhesion to clay. Forest horsetails are larger than field horsetails, sometimes they form real thickets, filling the entire forest, so that such plant raw materials for a whole house can be collected in just a day. Instead of a linen or hemp bonfire, a nettle bonfire is suitable.
The basis of the adobe mass is clay, which, depending on the content of sand in it, is divided into fat (2...3% sand), medium (approximately 15%) and skinny (more than 30%). Clay (especially fatty) absorbs water well, forming a dough, while it swells and increases in volume. When the clay dries, it decreases in volume and cracks form on its surface. When freezing, the clay swells and also increases in volume. The dough made of clay is plastic, easily takes any shape.
Medium fat and greasy clays are suitable for the manufacture of adobe bricks (bricks made of thin clay are fragile, crumbly and brittle).
Before you start making adobe bricks, it is very important to learn how to determine the quality (fat content) of clay. To do this, first we prepare a dough from clay: we put clay in a jar and, adding water to the jar and carefully kneading the clay with our hands, we knead from it a steep homogeneous dough of such density that it does not stick to the hands. Then we proceed to the actual determination of its fat content.
Method #1. From the dough we roll a ball with a diameter of 40...50 mm, we lay it between two planed boards, after which, pressing on the top board, we gradually squeeze the ball until cracks form on it. According to the degree of deformation of the ball, we determine the quality of the clay. Thus, balls of lean clay, even with a slight load, immediately crumble into pieces, balls of medium—fat clay crack when the distance between the boards decreases by 1/3 of the diameter of the ball, and balls of fat clay - when this distance is reduced by half (Fig. 1).
 Fig. 1. Method for determining the properties of clay by squeezing the ball: a — a ball between the boards; b — medium fat clay; c — fat clay. |
Method #2. From the same dough, we roll out flagella with a diameter of 10...15 mm and a length of 150...200 mm. Next, either stretch and tear the flagella, or wrap them around a smooth pipe with a diameter of 40...50 mm. In the first case, the degree of fat content of clay is determined by the shape of the ends of the torn flagella (Fig. 2).
 Fig. 2. A method for determining the properties of clay by the method stretching of the flagellum: a — fat clay; b — medium fat clay; c — thin clay. |
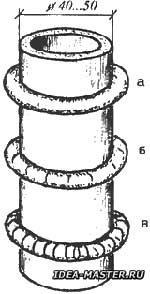 Fig. 3. Method for determining the properties of clay by bending the flagellum around the pipe: a — fat clay; b — clay of medium fat content; c — thin clay. |
So, the flagella of greasy clay are pulled smoothly and sharp ends are formed at the point of rupture. In the case of clay of medium fat content, the flagella also stretch smoothly, but, breaking off, they leave blunt ends, and the diameter of the flagella at the point of breakage is less than 5...6 times the original. The flagella of skinny clay stretch slightly, giving uneven breaks. In the second case, the quality of the clay is assessed by cracks appearing on the surface of the flagella when they bend (Fig. 3).
For example, if there were no cracks on the flagellum wrapped around the pipe, then the clay is greasy, the appearance of small cracks indicates medium-fat clay, multiple deep cracks, or even a rupture of the flagellum leave no doubt that the clay is skinny.
Thus, having tested clays from different places, we choose medium-fat or greasy clay for adobe bricks. The first one is best suited for adobe bricks, because when composing an adobe mass from such clay, sand is not added to it, while fatty clay will have to be brought to the state of clay of medium fat content (this is about 15...16 kg of sand per 100 kg of fatty clay). Clean sand is required, that is, without impurities of silt and other pollutants. The best sand is mountain sand, but river sand is less suitable because it adheres to clay worse.
Suitable for the manufacture of adobe bricks, we put clay in a pile with a height of no more than 1 m and leave it in the open air for the winter so that the clay is well soaked, loosened and frozen, which will make it more plastic.
How adobe bricks are made — manufacturing technology
Adobe bricks are made in early spring, so that during the summer they can produce not only the right number of bricks, but also dry them, as well as lay out the foundation and walls of the house, build a roof. We choose a place for making bricks next to the future house, because the bricks are large and heavy, so it is troublesome and expensive to transport them from afar. First, we make a workplace — a boardwalk, on which we will cook adobe. Usually the dimensions of such flooring range from 2x2 m to 4x4 m. It is not recommended to mix clay on the ground, since in this case the earth and any garbage will definitely get into the adobe mass.
The work starts like this. We throw a convenient amount of clay on the flooring, break up the lumps with a shovel, pour water, mix the clay, shovel, if there is too much fat clay, add the necessary amount of sand, mix again, knead with our feet until the clay is completely mixed with sand and the mass becomes homogeneous. Then we add straw cutting, previously moistened with water, a bonfire and again we crumple. The result should be a homogeneous mass in the form of a thick porridge. Then we rake the adobe mass into a pile, where it ripens for two days, after which we start mixing it again and kneading it with our feet. If necessary, add water, bringing the mass to the density required for the formation of bricks. It is clear that it should be convenient to fill the mold with mass, and bricks-blocks that have fallen out of the mold should not fall apart.
The sizes of adobe bricks are not set by the standard, so it is not forbidden to choose these sizes yourself, but they are usually slightly larger than the sizes of fired bricks (see the table).Dimensions of finished adobe bricks and molds for them with shrinkage of about 8%
| Type of brick | Dimensions, cm | |
|---|---|---|
| brick | form | |
| Large | 40x19x13 | 43x20,5x14 |
| Average | 36x17x13 | 39x18,5x14 |
| Shallow | 30x14x10 | 32.5x15x11 |
Forms (single or double) for the manufacture of bricks are made in the form of boxes without a bottom, which are made of boards with a thickness of 20...25 mm. Often, the walls of the molds are placed a little «on the cone» (at the top of the mold, the distance between the opposite walls is slightly larger than at the bottom), so that the bricks fall out of the molds more easily. Considering the shrinkage of clay during the drying process, the dimensions of the molds are slightly larger than the sizes of bricks (see the table). Figure 4 shows the shape for two medium-sized bricks.
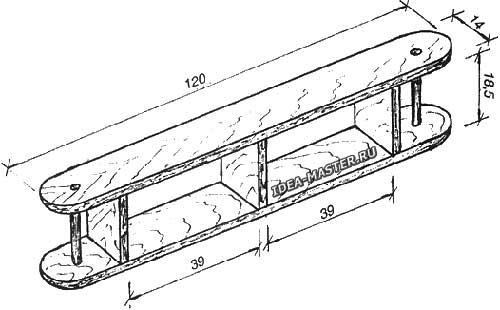 Fig. 4. A mold for making two medium-sized bricks. |
For forming bricks, pallets are still needed, that is, boards (wooden boards) with dimensions of 50...60 mm is more than the width and length of the molds. To form bricks, we put the mold on a pallet, moisten its walls with water and sprinkle with chaff so that the adobe mass does not stick to them. Instead of chaff, crumbs of moss, small bones, poplar or willow down, wool and horsetail branches will do. Then we pick up a lump of adobe mass with a shovel (the volume of the lump should be greater than the volume of the mold) and throw it into the mold. It is advisable to fill out the form once, since the additional adobe mass (rivets) often does not form a single unit with the main lump and usually falls off during the drying process. The adobe mass, which is in the form, is tamped with a manual tamper, after which we remove the excess mass with a wet plank. To intensify the drying of the brick, when the latter is still in shape, we pierce the brick in 5...6 places with a long awl with a diameter of 10...12 mm. Such through holes significantly accelerate drying, and it passes more evenly. The excess clay removed from the mold is returned to the total mass, which is thoroughly mixed to restore its uniformity.
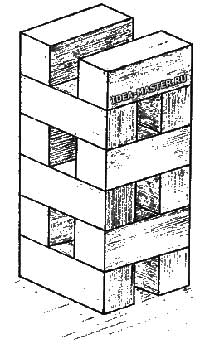 Fig. 5. Bricks are dried in wells. |
Next, we transfer the forms filled with the mass to the drying area and, tipping over, carefully dump the bricks flat on a plastic film or straw crumbs. In case of rain, the bricks are covered with the same plastic wrap. It is best to dry the bricks under a canopy in a light draft, as a result they are obtained without cracks and dried fairly evenly. Bricks laid out flat from the molds are kept for 3 days so that they acquire sufficient strength so that they can be turned over. Then we install the bricks on the edge, providing gaps between them for the passage of air, and dry it for another 3 to 7 days. Then we put the bricks in «straight pillars» or «wells», placing them on the edges in pairs. In this position, they finally dry out and harden (Fig. 5). It is very good to put ordinary burnt bricks under the lower rows of adobe bricks. With such a laying, the drying of adobe bricks goes more evenly. And for better drying of bricks, it is very useful to change their position over the summer (at least once). For example, if the bricks were lying on the edge, then they are laid flat, it is desirable to shift the upper rows down and vice versa. This work is small, but very useful, speeding up the drying of bricks.
Adobe brick is considered to be completely dried and suitable for masonry if its color in the fracture is similar to the outer color. A good brick has no cracks and is strong enough (it does not break when falling from a height of 1.5...2 m), while it is well cut with an axe and does not get wet in water during the day. A hammered nail is held firmly in a brick, as in a tree.
How to build adobe brick houses
Before the construction of any house (brick, adobe, wooden), it is necessary to develop its project, «tied» to the surrounding area and taking into account the specific conditions of the area. That is, it is necessary to determine the design and materials of the foundation, basement, walls, as well as to develop measures to protect the structure from atmospheric and groundwater. Issues such as the floor, ceiling, partitions and roof are more or less clear, they are the same for all houses.
The foundation is the supporting part of the house, transferring its load to the ground. Both the operational qualities of the house and its durability depend on its reliable «work». It is often possible to see rural houses with skewed terraces and verandas, and sometimes with cracked walls, which indicates the incorrect design and construction of the foundations of these houses.
The foundation is the only element of the house, the construction of which depends on the properties of the soil on which it is erected, that is, on the depth of freezing of the pound, the level of groundwater. The article by B. Batalin describes in detail the types and characteristics of soils and factors affecting the construction of foundations. As you know, foundations for manor houses usually come in two types: ribbon (continuous along the perimeter of the house) and columnar (in the form of separate supports installed along the perimeter at certain distances).
Ribbon foundations are built on dry and low-moisture non-porous soils when groundwater lies below the depth of freezing of the soil. Non-porous soils include: pebbles, gravel, sands (coarse-grained, fine, dense, loose and permeable). In such soils, when they are dry and not wet, when they freeze, swelling is not observed, because seasonal deforming forces do not act on the foundation. Heaving soils (clays, loams, sandy loams, fine and powdery sands), which swell strongly when moistened, swell when frozen, therefore, columnar foundations are arranged in such soils, the design of which is determined by the location of groundwater (below or above the freezing level of the soil) at the construction site of the house.
What foundation should I recommend for an adobe house? It depends on the characteristics of the soil in the area where you are going to build a house. Therefore, we will reason as follows. Suppose that the adobe building will be located in an area with a depth of 170 cm of ground freezing, with a deep groundwater occurrence. Let's further assume that the house is supposed to be built in a rural area. And as you know, although villages are usually located along the banks of rivers and along ravines, but always away from damp places with shallow groundwater.
Assuming such conditions, we consider the depth of freezing of the soil (170 cm) to be known, as well as the fact that groundwater lies below the depth of freezing. To determine the nature of the soil, builders need to drill the ground in several places (along the perimeter of the future house) and analyze the excavated soil, which can be either unpuchinisty (the same low-moisture sands, pebbles, gravel), or puchinisty (clay, sandy loam, loam, fine sands). Therefore, here we will offer options for foundations on non-porous and heaving soils with deep groundwater, and after analyzing the soil on your site, you will choose one of them.
Strip foundations on non-porous soils
The depth of laying such foundations for one- and two-storey houses on the above-mentioned soils is small and usually amounts to 50...70 cm (the lower the density of the soil, the deeper the foundation is arranged). Depending on the materials used, crushed stone, brick, rubble, rubble concrete and concrete block foundations are distinguished. When constructing houses with heavy walls of stone, brick, adobe, foundations are made of brick, rubble, concrete blocks, etc. Of the above materials, the most suitable and cheap are well-fired ironstone bricks and rubble stone, which is obtained in sand and stone quarries. Crushed stone foundations are usually arranged for terraces and verandas. Ribbon foundations are reliable, durable, and since their supporting area significantly exceeds the required design area, they ensure a stable condition of the house.
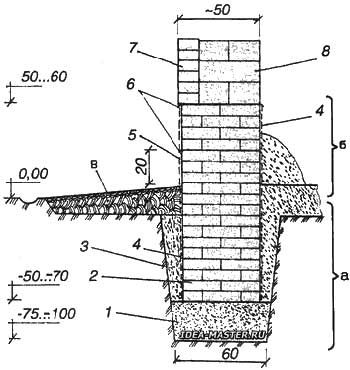 Fig. 6. Construction of a ribbon foundation made of brick: a — foundation; b — plinth; c — blind area; 1 — sand cushion; 2 — brickwork; 3 — backfill; 4 — bitumen coating; 5 — plaster; 6 — waterproofing (roofing material); 7 — facing brick; 8 — masonry from samana. |
When calculating the foundation, it is necessary to take into account the thickness of the walls of the house. For example, in an adobe house it is approximately 50 cm. As already mentioned, adobe is very hygroscopic, therefore, during the construction of walls made of adobe bricks, special attention is paid to the construction of a basement, which is charged with protecting the lower parts of the outer walls arranged on the foundation from dampness. And although the plinth is actually the lower part of the wall itself, let's consider its «device» here, in the «Foundation» section. The plinth usually rises above the ground by 50...60 cm . It is laid out of durable frost-resistant materials (ironstone bricks, rubble stone, concrete blocks) and lined with ceramic tiles. On the upper leveled surface of the socle — the base for the future wall of the house — waterproofing is laid from roofing material, for which the layer of the latter is first glued to the surface of the socle with heated bitumen (or bitumen mastic), after which the second layer is glued to the first layer of roofing material. It is also necessary to provide a similar waterproofing in the thickness of the basement masonry at a height of about 20 cm from the blind area (Fig. 6). This is easy to do if the masonry is made of brick or rubble stone. In addition to this waterproofing in the basement, you can arrange an additional one, which we will mention below, talking about the construction of foundations and plinths.
Why such thorough waterproofing? Yes, because the plinth is constantly getting wet under the influence of moisture in the ground and falling on the plinth in the form of raindrops. It is clear that in the absence of waterproofing in the basement, moisture enters the walls through the capillaries of the foundation and the basement, moistening them. An increase in the humidity of the walls leads to a decrease in their thermal insulation qualities, as a result, heat will leave through these walls more actively and they will begin to sweat. Therefore, the installation of waterproofing in the foundation and basement is a necessary condition for the thermal protection of the house, and for wooden and adobe houses this is a particularly important point.
After the foundation and plinth are erected, it is necessary to arrange a blind area around the perimeter of the house to protect the foundation from the effects of atmospheric and flood waters. The blind area is performed from the walls with a slope of 1:10. To set up a blind area along the foundation, the soil is removed to a depth of 10...15 cm, forming a shallow circular «trench» with a width of 90 around the house...100 cm. The resulting trench is filled with a layer of greasy clay, it is carefully compacted, forming a clay surface under the aforementioned slope. Then a thin layer of sand with crushed stone, gravel, brick fight is poured on top, then the filling is rammed and filled with cement mortar. To drain water from the house, grooves are also provided.
To prevent the appearance of dampness in the underground and for ventilation of the latter on each side of the house, holes (blowouts) of 150x150 mm in size are arranged in the walls at a height of at least 150...160 mm from the level of the blind area.
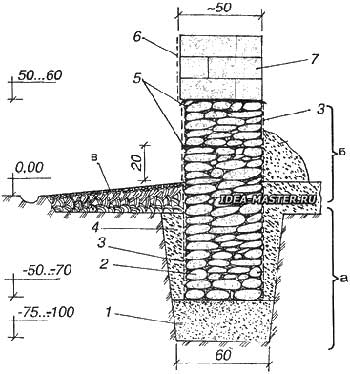 Fig. 7. The device of the ribbon foundation made of rubble stone: a — foundation; b — plinth; c — blind area; 1 — sand cushion; 2 — rubble stone; 3 — bitumen coating; 4 — backfill; 5 — waterproofing (roofing material); 6 — plaster; 7 — adobe masonry. |
When erecting a foundation and a basement made of bricks, masonry is performed with ligation of seams, and when masonry is used high-quality rubble stones: limestone, sandstone, granite, etc. For the first row of the foundation stone, large stones are chosen, first they are laid along the edges, and then fill the middle, trying to make the stones lie as tightly as possible to each other, forming at the same time a more or less flat horizontal surface. Rubble masonry is carried out with mandatory ligation of seams, while the seams should be as thin as possible.
As already mentioned, during the construction of plinths in them, ventilation ducts are performed on each side of the house and waterproofing of roofing material is arranged in two places: on the surface of the plinth and in the thickness of the masonry 20 cm higher from the blind area. And they also thoroughly coat the surfaces of the foundation and parts of the plinths from the underground and blind area with heated bitumen, after which they produce a compacted backfill. Then arrange a blind area along the foundation.
Columnar foundations in deep-lying soils with deep groundwater
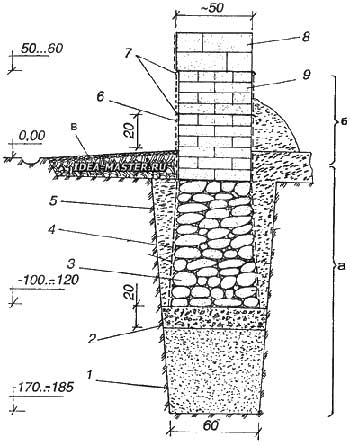 Fig. 8. The device of the element (pillar) columnar foundation: a — foundation; b — plinth; c — blind area; 1 — sand cushion; 2 — rubble layer; 3 — rubble stone; 4 — bitumen coating; 5 — backfill; 6 — plaster; 7 — waterproofing (roofing material); 8 — masonry from adobe; 9 — brickwork. |
Such foundations (and plinths) are made of brick, rubble stone and rubble concrete. The «pillars» are located at a distance of 150...250 cm apart along the perimeter of the house, be sure to install them at the corners of the house, as well as at the intersection of the walls. In terms of material consumption, columnar foundations are 1.5...2 times more economical than tape foundations, but at the same time, difficulties arise with the device of the base during their construction. If, with a ribbon foundation, the plinth is, as it were, its continuation, then with a columnar one, a fence (fence-wall) is built separately between the pillars of the foundation.
When erecting columnar foundations for each pillar, a pit is torn off with a depth of at least the freezing level of the soil (in this case, at least 170 cm). Figure 8 shows an element (pillar) of a columnar foundation, in the construction of which rubble stone and ironstone bricks were used. The prepared pit is filled with coarse-grained sand in layers of 10 cm, shedding each layer with water and tamping it thoroughly and strongly. On a sand cushion (its height is 45...50 cm) lay a layer of crushed stone, gravel or brick battle with a thickness of 20 cm. This layer is also carefully rammed and poured with a cement-lime mortar made up of 1 part (by volume) of cement grade «200», 2 parts of lime dough, 10 parts of sand. The surface of the crushed stone layer is below the planning level by 100...120 cm . Next, masonry is made of rubble stone, and the first layer of stone is laid on a cement mortar. They complete the rubble masonry, not reaching 10 cm to the zero mark. Further, the pillar is already formed from brick-ironstone, bringing its height to 50...60 cm (above ground level). In the brick part of the pillar, waterproofing of roofing material is provided. Only here the roofing sheets should protrude from the brickwork (to the left and right of the pillar) by 20 cm (we will need these protruding edges of the roofing material for waterproofing future fences). It remains to coat the foundation column with liquid heated bitumen (to zero), then fill the sinuses around it with the removed soil and tamp the latter. A variant of a brick fence (plinth), the purpose of which is to fill the space between two foundation pillars, is shown in Fig. 9.
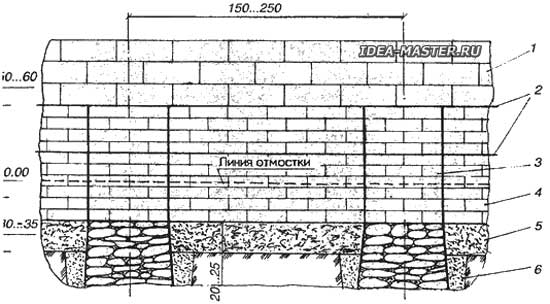 Fig. 9. Sampling device: 1 — adobe masonry; 2 — waterproofing (roofing material); 3 — foundation pillar; 4 — brick masonry; 5 — sand cushion; 6 — backfill. |
For the construction of such a fence, a trench with a width of 50 cm and a depth of 30...35 cm is torn off between the pillars. Next, the trench is filled with coarse-grained sand to the top of the rubble masonry. Sand is spilled with water, carefully rammed and a wall (zabirka) of brick-ironstone is removed on it to the top of the brickwork of the pillar. In zabirki, as well as in the brick part of the pillar, waterproofing from roofing material is organized. At the same time, the edges of the roofing sheets protruding from the brickwork of the pillars are laid on the corresponding brick rows of the fence and glued to the latter together with the sheets of roofing material — waterproofing of the fence — with heated bitumen. Ventilation ducts are arranged in the zabirki on each side of the house. From the underground side and from the outside, the zabirka is covered twice with heated bitumen to the level of the blind area, which is necessarily arranged along the foundation.
So, we have considered the options for foundations built on non-porous and heaving soils with deep groundwater. Now, after analyzing the soil removed from a depth of up to 170 cm at the site of the future house, we choose one or another of the foundations described above for an adobe house. Of course, other materials can also be used, for example, concrete blocks, etc., will be suitable instead of rubble stone.
Preparatory work during foundation construction
When starting the construction of the foundation, on the site where the house will stand, remove the vegetable fertile layer of earth to a depth of 15 cm and transfer it to the garden or vegetable garden. Then the surface of the site is leveled and the contours of the foundation of the house are marked out in full size using a cord and a large wooden right triangle, that is, a triangle with an aspect ratio of 3:4:5 (Fig. 10, a). All dimensions are carefully measured, right angles are set, of course, with the help of a triangle, mark the marking lines with hammered pegs. The squareness of the foundation plan is checked by measuring its diagonals, which should be equal.
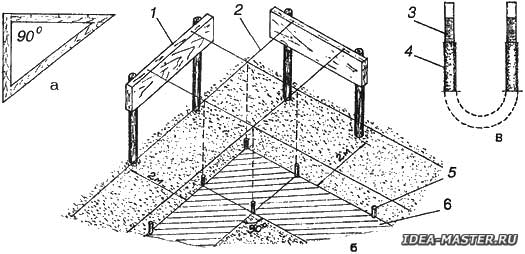 Fig. 10. Marking of the plot for the foundation: a — a right triangle; b — a rag device; c — a level; 1 — board; 2 — cord; 3 — glass tube; 4 — rubber tube (hose); 5 — peg; 6 — foundation plan. |
To preserve the marking of the foundation during excavation at a distance of 1.5...2 m from the marking along its perimeter, a cast-off wooden posts with a height of 1...1.5 m are installed, to which boards are nailed (Fig. 10, b). Cords are stretched between opposite boards so that they pass strictly over the driven pegs (marking lines) and fix the cords with nails. If the cords interfere with work, they can be temporarily removed by keeping the nails on the boards so that the cords can be restored later.
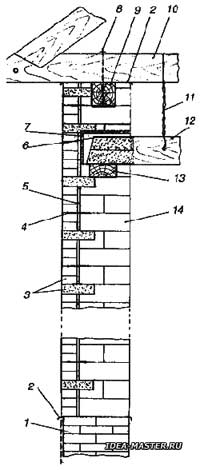 Fig. 11. Adobe wall with external brick cladding: 1 — plinth; 2 — waterproofing (roofing material); 3 — facing bricks; 4 — metal brackets; 5 — air gap; 6 — waterproofing of the end of the ceiling beam; 7 — wooden box; 8 — M20 bolt; 9 — timber; 10 — rafter tightening; 11 — twisting; 12 — ceiling beam; 13 — timber; 14 — adobe masonry. |
To check the horizontal lines and surfaces, it is convenient to use a homemade device — a level of two glass tubes and a rubber tube or hose (Fig. 10, b). The system of communicating vessels is filled with tinted water. The operation of the device is based on the fact that the water in the tubes is always installed at the same level, which makes it easy to detect, for example, whether any platforms are in the same horizontal plane.
Having marked the place for the foundation, proceed to excavation. The shape of the trench under the ribbon foundation depends on its depth. So, at a depth of up to 1 m, the walls are made vertical, and at a greater depth — with a slope. Also, trenches are made with inclined walls if the soil is loose, crumbling. Sometimes in this case it is even necessary to «dress» the walls in the formwork. Round pits with a depth of at least 170 cm are prepared for the pillars of columnar foundations. It is better in this case to use a mechanical digger, and from above to expand the pit manually with a shovel. And finally: the construction of foundations is started immediately after excavation.
Adobe brick walls
The thickness of the walls of houses made of both adobe and baked bricks depends on the average ambient temperature in the cold season, which for most areas of the European part of Russia is -30 °C. In places with such a temperature, houses are built with external walls approximately 50 cm thick, while not forgetting to take all possible measures to insulate them, for example, to conduct masonry with the formation of air gaps or to insulate walls indoors.
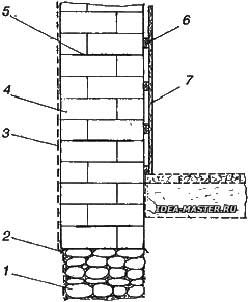 Fig. 12. Adobe wall, plastered from the outside and insulated from the inside: 1 — plinth; 2 — waterproofing (roofing material); 3 — plaster; 4 — adobe masonry; 5 — reinforcing mesh; 6 — rail; 7 — plate (fiberboard or SGS). |
It was noted above that adobe walls are very hygroscopic and that sheets of roofing material are laid in the basement between the rows of bricks to protect them from ground moisture. In addition, adobe walls must also be protected from atmospheric moisture and water vapor, always present in the room. To protect the walls from atmospheric moisture, they are either lined with burnt brick or plastered from the outside. In Fig. 11 shows a vertical section of a wall made of adobe bricks with a thickness of one brick and lined with baked (half brick) with the formation of an air gap between the wall and the cladding. Cladding is usually performed after the precipitation of the house, that is, after about a year. A variant of a wall made of adobe brick with a thickness of one and a half bricks, plastered on the outside and insulated from the inside, is shown in Fig. 12.
The features of laying an adobe wall in one brick and facing of burnt bricks with ligation of vertical seams during their laying are clear from Fig. 13, and the laying of an adobe wall in one and a half bricks (followed by plastering the wall and its insulation) is given in Fig. 14.
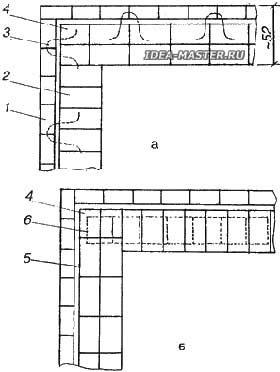 Fig. 13. Ligation of seams of facing bricks and adobe masonry in one brick: a — odd row of masonry; b — even row of masonry; 1 — burnt brick (facing); 2 — whole brick of adobe (wall); 3 — metal bond (bracket); 4 — 3/4 brick of adobe; 5 — air gap; 6 — reinforcement mesh. |
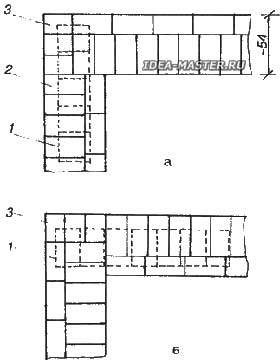 Fig. 14. Ligation of seams of adobe bricks in one and a half bricks: a — odd row of masonry; b — even row of masonry; 1 — reinforcing mesh; 2 — solid brick; 3 — 3/4 brick. |
First row adobe bricks are laid on top of a plinth covered with layers of roofing material. Then the masonry is continued to the required height of the wall. The strength of the masonry depends on the quality of the mortar used. Usually, in this case, a clay-sand solution is used, composed of 1 part (by volume) of clay of medium fat content and 1.5...2 parts of sifted mountain sand (not river sand!). Solutions based on lean clay are not suitable, since they do not have plasticity and strength, solutions from fatty crack when drying, but solutions from medium-fat clay do not have such disadvantages. The amount of sealing water is about 1/4 of the volume of clay, as a result, the solution is slightly thicker than sour cream. A liquid solution is undesirable, as it strongly moisturizes the walls. And it is also necessary to add finely chopped straw to the solution. The strength of the solution will increase significantly if 0.5...1 liter of dry cement is added to 1 bucket of solution, but then this solution must be applied no later than 1 hour after its preparation. The masonry of adobe bricks is carried out in the same way as from burnt, that is, with a seam thickness of no more than 10 mm. It is advisable to prepare clay dough in advance. To do this, pieces of clay are soaked in water, where they are kept until completely soaked, then the excess water is drained.
Rules observed during the construction of adobe brick walls
1. Rows of bricks are laid, providing ligation of vertical longitudinal and transverse seams, using whole bricks and its parts.
2. A plastered or lined wall should hang over the basement, which makes it possible to hide the waterproofing layer well from mechanical and atmospheric influences.
3. At the intersection of the walls and in the corners, reinforcing grids in the form of a «ladder» with 6x6 cells are laid in horizontal seams through 3...4 rows...10x10 cm . If the «ladder» is laid in one wall in an even row, then in the adjacent wall — already in an odd one. With the intention of lining the outer walls with burnt brick, metal ties (staples) are laid in the horizontal seams of the adobe masonry in the form of the letter P. These staples protrude from the adobe masonry by 8...10 cm, install them through 3...4 rows at a distance of 1...1.5 m from each other. The material of reinforcing grids and ties is steel wire with a diameter of 5...6 mm, coated with heated bitumen for corrosion protection.
4. If the adobe wall is supposed to be plastered, then the masonry is being hollowed out, without bringing the mortar in the seams to the wall surface by 1...1.5 cm. In other cases, the seams are flush with the wall.
5. Window and door openings are arranged at a distance of 1.5 m or more from the corners of the house, the width of the piers is at least 0.9 m. For fixing boxes under windows and doors in the walls of openings, wooden plugs impregnated with antiseptic and coated with bitumen are installed in the course of masonry (two in the window openings, three in the doorways on each side of the opening). Lintels for window and door openings are made of bars with a thickness of 10...12 cm, nailing two side bars to the central bar. The central bar is laid along the entire length of the wall, and the side ones are placed under the openings.
6. Adobe walls cannot withstand concentrated loads, for example, from floor beams and old-timbered puffs. In such cases, they act this way. Beams are placed under the floor beams along the entire perimeter of the walls (see Fig. 11), the ends of the beams are connected in half a tree and fastened with nails or staples. The thickness of the beam is 10 cm and the width is 16...20 cm. The surface of the beam is covered with bitumen mastic. The ends of the ceiling beams should go into the opposite walls to a depth equal to 3/4 of the wall thickness, they are fastened with brackets or nagels with a bar. The ends of the beams entering the walls are covered with bitumen mastic and wrapped with two layers of roofing so that moisture from the beams is not transferred to the walls. The ends of the beams are cut off obliquely, and mastic is not applied to them and they are not insulated with tolem. After installing the floor beams, oil-soaked wooden boxes are put on their ends and further masonry is continued.
Having completed the laying of adobe walls, the beams connected to each other in half a tree and fastened with brackets or bolts are sealed flush on top of them around the perimeter. The bars (their cross-section is not less than 18x18 cm) are covered with bitumen mastic. Next, two layers of roofing are laid on top of the wall on bitumen mastic. Rafter tightens (see Fig. 11) are fastened to the beams with bolts or brackets and additionally connected to the floor beams with boards or twists of thick wire.
Again about adobe walls
As mentioned above, adobe is very hygroscopic, so outside the walls of a house made of adobe are usually either lined or plastered, which, by the way, increases their thermal insulation ability. Therefore, we will consider in more detail the option of wall cladding with burnt brick with the formation of a gap of 4...5 cm between the wall and the cladding. The first row of facing bricks, as before and adobe, are placed on the waterproofing of the basement and continue laying in the usual way to the top of the wall, observing, of course, the ligation of the seams. The dressing of facing bricks with an adobe wall is organized with the help of metal brackets laid earlier in the adobe masonry. At the same time, part of the facing bricks are laid with a poke into the adobe wall, placing these bricks through 4...5 rows at a distance of up to 1 m from each other. For this purpose, holes for bricks are cut in the adobe wall with a chisel, which are sealed in the wall with a solution. Gaps that have arisen around window and door openings during the construction of cladding are closed with wooden blocks, and small cracks are sealed with mortar. The bars must be covered with bitumen mastic. Facing adobe walls with the organization of air gaps not only protects the walls from the effects of external moisture, but also reduces their purge and makes them warmer, because the air in the gap is a good heat insulator. Note also that although the approach to the air is tightly closed at the bottom, above the basement, weak vertical flows are created in the air penetrating into the gap through the pores in the walls, that is, ventilation is going on. So the moisture that got into the gap through cracks and leaks in the wall of facing bricks during oblique rains and snow drifts is not deposited on the adobe wall, but evaporates and is removed by the air flow outside. Thus, thanks to the air gap, the adobe wall always remains dry, and therefore warm. Sometimes an adobe wall is lined with baked brick without an air gap or the gap is filled with insulation, for example, expanded clay gravel.
Inside the house, to protect against water vapor, adobe walls are covered with plaster, which is usually applied in three layers. Lime-clay solutions are best suited for plastering internal walls. For spraying (1st layer), a liquid solution is prepared from lime, clay and sand taken in the ratio 1 : (0,3...0,5) : (3...5). The spray thickness is not more than 5 mm. For the soil, a thicker solution is made, where the same components are mixed in the ratio 1 : (0,7...1) : (2,4...4). The soil is applied in several layers. The total thickness of the soil is less than 9...10 mm.
The covering (3rd layer) consists of traditional lime (1 part), clay (0.3 ... 1 part) and sand (1.6...4 parts). The usual layer thickness is about 2 mm. In order for the plaster to hold well on the wall, furrows up to 10 mm deep are cut with an axe on the surface of the latter and masonry seams are slightly expanded.
For plastering adobe walls from the outside, you can use a cement — lime dough — sand solution. Ratio of components in the spray — 1 : (0,3...0,5) : (3...5), in the ground — 1 : (0,7...1) : (2,5...4), in the cover — 1 : (1...1,5) : (1,5...2). For a more reliable adhesion of plaster to the wall nails are hammered into adobe bricks, and a wire mesh is woven over them. Nails are hammered so that their caps are in the plaster layer, and the caps are smeared with heated bitumen. Cement-lime mortar is prepared in different ways. In one case, the cement is closed with water to the thickness of sour cream, lime dough, sand are added and everything is mixed. You can also mix sand with cement, prepare a lime dough of the consistency of liquid sour cream and seal the cement-sand mixture on this dough. As already mentioned, the solution is used for plastering the exterior walls of the house, as well as the basement and fences. The solution is suitable for operation for 1 h.
The insulation of adobe walls inside the house is organized in different ways, using sheets of dry gypsum plaster (SGSH) or fiberboard (fiberboard) as insulation materials. Particle boards (chipboard) are not used as insulation because of their toxicity. When finishing the walls, sheets of SGS and fiberboard are nailed to wooden slats with a cross section of 25x50 mm previously impregnated with antiseptic, in turn nailed to the walls. Usually the slats are placed on the wall in increments of 30...50 cm vertically and horizontally, installing wooden nail plugs in the adobe wall. The seams between the sheets are glued with gauze tapes (100 mm wide), after which the walls are painted or papered. The air layer between the adobe wall and the slabs of SGS or FIBERBOARD increases the thermal insulation qualities of the wall, and wallpaper or paint protects the walls from moisture.
We would really like this article to help you at least a little in such a difficult matter as building a house. Answers to other questions that may arise in the process of building a house can be found in the books: A. M. Shepelev «How to build a rural house» — M.: Rosselkhoznadzor, 1984; N. M. Soghomonyan «Rural residential house» — M.: Agropromizdat, 1988.
In the section «Repair and construction»
| Share this page on social networks: |
