Homemade pipe threading machine. A device for threading
When cutting 1/2" (1/2 inch) pipe threads on water pipes manually, you first have to file the inlet chamfer at the end of the pipe. Further, by rotating the collar with the die and applying a fairly significant longitudinal (axial) force to the collar, we achieve embedding the die into the end of the pipe. If there is insufficient force or a misalignment of the die, it is not possible to start threading, so you have to file the chamfer on the pipe again.
Thread cutting device
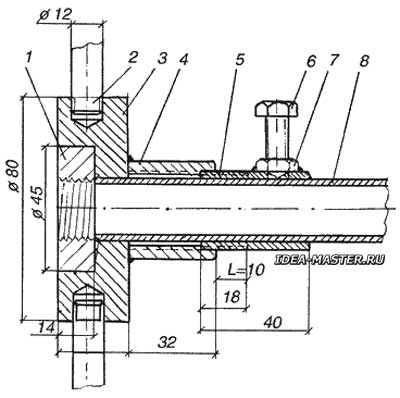
The simplest device that eliminates these difficulties and allows threading without any effort at all along the pipe and even without chamfering on the pipe is shown in the figure. The actual die is fixed in a die holder with two handles. There are screws in the die holder housing that fix the die in it (in Fig. not shown). A steel coupling with 3/4" internal thread is welded to the body. From a piece of pipe with a diameter of 3/4" and a length of 40 mm, a sleeve is made with three nuts welded to it along the circumference, into which stoppers are screwed (M8 bolts with a length of 25 mm). At one end of the sleeve (in a section 18 mm long), a 3/4" external thread is cut, and the inner hole of the sleeve is enlarged to a diameter of 22 mm (manually, with a file), so that a 1/2" pipe easily passes through the sleeve.

1/2" pipe threading device:
1 — die; 2 — die holder handle; 3 — die holder housing; 4 — coupling with 3/4" internal thread; 5 — sleeve with 3/4" external thread; 6 — locking bolt; 7 — nut; 8 — 1/2" diameter pipe.
For threading on a 1/2" pipe, a die holder with a coupling is screwed onto the sleeve, and from the end of the coupling to the end of the thread on the sleeve, a distance L is set equal to the length of the thread being cut on a 1/2" pipe. Next, insert the 1/2" pipe, on which the thread is supposed to be cut, into the sleeve so that the end of the pipe rests against the die, after which the pipe is stopped in the sleeve with all three stoppers. Now, rotating the die holder with the help of handles, screw the coupling (together with the die) onto the sleeve, ensuring the movement of the die with a pitch of t=1.814 mm (14 threads per inch) without applying longitudinal force and not paying attention to whether there is a chamfer on the pipe or not. This situation develops because the 1/2" thread on the pipe and the 3/4" thread on the coupling and sleeve have the same pitch.
Practice has shown that threading a pipe with this device is a pleasure. Of course, when threading a pipe, the latter must be securely clamped in a vice.
Technological advice, failure to comply with which will lead to the malfunction of the device
1. To ensure the alignment of the die and the coupling, it is necessary to assemble the entire device on a 1/2" diameter pipe with a pre-cut thread , screw the pipe into the die and only then weld the coupling to the die holder housing.
2. To ensure the alignment of the thread for the stoppers available in the nuts, and cut into the wall of the sleeve, it is necessary to first weld three nuts, evenly distributing them around the circumference of the sleeve, then drill the wall of the sleeve, using the nut as a conductor (through the nut), and then cut the thread in the wall of the sleeve.
All materials of the section «Ideas for the master»
| Share this page on social networks: |
