Homemade wood cutters. How to make a wood cutter with your own hands
From the editorial office. We have repeatedly invited Alexander Alexandrovich Korneev, a manufacturer of high-quality wood cutters, to share his experience with everyone who wants to learn this craft. And now, from the distant Khabarovsk Territory, we received the long-awaited material that we offer to our readers.
How I make wood cutters. Homemade cutters
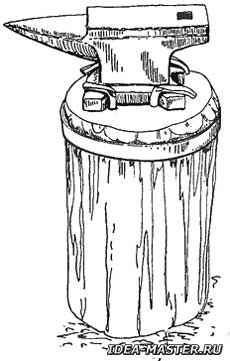 Fig. 1. An anvil on a massive block. |
Actually, I'm a little tight with mentoring, but I'll try to tell about the professional manufacture of wood cutters with my own hands. It makes sense to do this business, I'm not afraid of competition, but every game should be worth the candle. Of course, making incisors for yourself is somewhat expensive and a lot of hassle. One or two sets are much easier to purchase from a specialist for 10 units, and without any prepayment. But if you have a desire to start your own business and a little money for its «promotion», then read this material, evaluate your capabilities and... go ahead.
I offer the most simplified version of the workplace organization for making wood cutters with your own hands. First of all, it is necessary to have an anvil, preferably weighing about 100 kg, smooth, not broken, and securely fixed on a massive chock (Fig. 1), dug into the ground or concreted in the ground. An anvil on a table or chair, as well as random «pieces of iron», rail cuts — all this is not serious, and it is not safe.
Fig. 2. Blacksmith's tongs. |
You will need a pair of forging pliers with a length of 0.5 m. The pliers are easiest to make from a steel rod with a diameter of 12 mm (Fig. 2). To bend the workpieces, you can use round pliers and ordinary pliers with threaded semicircular grooves in the sponges.
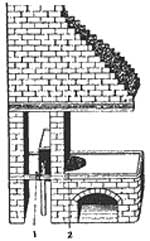 Fig. 3. Stationary horn with brick umbrella: 1 — water tank; 2 — hearth. |
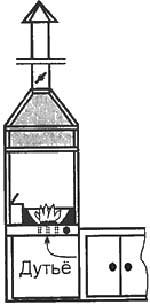 Fig. 4. Our horn. |
The horn is also mandatory, its device is hardly worth describing. Let me remind you that a furnace is a table with a hearth, that is, with a furnace socket for heating workpieces. In the center of the hearth there is a tuyere, through which air is supplied to the hearth from below, providing intensive gorenje coal. Good samples are presented in the «Do-it-Yourself» almanac No. 1 for 1990 (in the article «Hephaestus Heirs»). One of these horns is shown in Fig. 3.
Our bugle (Fig. 4) is simpler than the bugle shown in Fig. 3. Its frame is welded from a steel corner with a shelf width of 40 mm, and panels of roofing iron are mounted on rivets on the frame. The base of the furnace is a steel plate with a thickness of 18 mm.
It has a rectangular hole with a size of 80x150 mm for a steel tuyere also with a thickness of 18 mm. So that the tuyere does not fall into the hole, the walls of the hole have a small taper. Holes with a diameter of 5 mm in the tuyere — as many as possible.
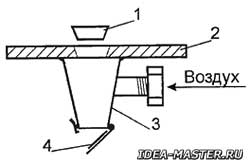 Fig. 5. The base of the furnace with a tuyere and an ash storage box: 1 — tuyere with holes; 2 — horn base; 3 — ash accumulator; 4 — asbestos gasket. |
The ash storage box is welded from 4 mm steel and welded to the plate under the tuyere (Fig. 5). 3 I also note that an inch—long water (steam) crane can be successfully used on the pipe to supply the blast instead of an air damper of the gate type. An inch pipe for blowing is also enough. Our furnace, closed on three sides, has an exhaust pipe with a diameter of 250 mm and a height of about 4 m. We close the shutters on the chimney at night in winter.
A vacuum cleaner is suitable as a supercharger, but it is better to install a small centrifugal fan, as we have done. Any coal is suitable (even wood), only not very large. The «dropout» is also suitable. It is desirable that the coal is slightly moist, since such coal burns more evenly. It is preferable that the container with the quenching oil is located in the furnace itself — the air will be cleaner and more convenient.
Metal for incisors is usually selected sheet, and without shells. We also polish it. It is better not to use ordinary carbon steel for cutters: it is difficult to form a cutting edge, and if the workpiece heats up during sharpening, all the work will go to waste. Good incisors come out of frame saws with a thickness of 2...2.5 mm, it is possible to cut an old hacksaw on wood for small incisors. And in general, it is very important to decide on a specific brand of steel, for example, to make a stock of 9HMF steel (it is not deficient) and work only with it. At the same time, in the process of work, select the necessary tempering and tempering modes for steel (using the «poke» method or according to the reference book) and do not suffer further with different steels from scalpels and bearings. After all, when working with one steel, there will be confidence that the product you have made will turn out to be of high quality.
The metal from which woodworking tools are made (circular saws, frame saws, knives from cutting machines, tape webs, etc.), as I have already said, are well suited for our cutters. Their working surfaces are smooth, polished. After all, what is meant to cut wood is what it should do. And besides, as a rule, the steels from which these tools are made have very similar quenching and tempering modes.
To cut metal into blanks, you will need powerful scissors. It is good if someone has access to the «guillotine», but this situation does not always happen. The gasoline-powered autogen is a bad helper in this matter — splashes fly from it when cutting, uneven edges are obtained from the workpieces, microcracks are formed in the metal. And alloy steel does not like such treatment — it warps, breaks. We have a desktop eccentric machine for cutting sheet steel, it is at least 100 years old, now they do not make such. With this machine, the effort of one hand is enough to cut a sheet of steel with a thickness of 5 mm or a rod with a diameter of up to 10 mm. When there was no machine, and it was bought in cooperative times, and very expensive, they managed by the grandfather's method. An ordinary frame saw made of steel 9KHMF, 9KHF, 9KHS, etc. was chopped on an anvil with a chisel made of a drill with a diameter of 25 mm (sharpening angle — 90°). The metal was marked with a scribbler and in several steps the sheet was cut almost half the thickness. Next, the sheet was turned over and on the reverse side (the chisel marks were visible), blows were struck on this trace with a sharp toe of a locksmith's hammer. As a result, the metal split like glass, and a fairly even split line was obtained. It should only be borne in mind that metal, like wood, has fibers along which it should be chopped. It is more difficult to cut across the fiber. Labor is hard labor, noisy and dangerous, as pieces fly in all directions. But people use incisors of that time to this day and they are not going to change to the German «Solingen». They don't look so nice, but you can't sharpen them with a file, in a word, not «bourgeois» things for six months of intensive work. Later, we bought a machine, brought it to mind, improved something and things got more fun. So, the blanks are ready. It is now possible to give the desired shape to the blanks.
If it is required to form a semicircular chisel for hand carving, then a strip of metal of the desired width with a total length of 110...150 mm is placed in a furnace on the heated coal and the entire workpiece is evenly heated to about 1150 °C (to a straw-yellow color). It should be noted that alloy steels do not like the extremes of heat treatment very much: underheating is cracks, overheating is coarse-grained. The heated workpiece is very quickly transferred to the matrix, placed in the desired groove and with the help of a punch and a hammer, the workpiece is given the shape of a gutter. Now she has to cool down by herself. No water and other forced cooling. When forming the shank, the end of the workpiece that you like less is heated again in the furnace to the same temperature (up to 115 °C), then its terminal part with a length of 30...40 mm is flattened to a thickness of 6...7 mm. Flattening is carried out either in a small vice, or on an anvil with a hammer (the latter method is not so accurate). Next, the shank is sharpened on emery in the form of a cone, the working part of the future cutter is cut and sharpened at an angle of 20°. Hardening is ahead, but for now we will focus a little more on the construction of matrices and punches.
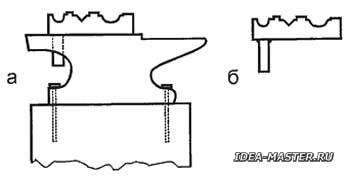 Fig. 6. Matrix on the anvil: a — the matrix itself; b — fixing the matrix on the anvil. |
As you know, the matrix is a part of the stamp, which has a recess corresponding to the shape (or contour) of the part to be obtained. Another part of the die is the punch, which presses on the workpiece located in the matrix. One of our first matrices is shown in Fig.6, from which it can be seen that the matrix is a thick steel plate with several longitudinal recesses of various profiles. Any milling machine can perform such a matrix. A 4-sided bar is welded to the matrix from below, with the help of which the matrix is strengthened on an anvil. However, now we do not use such a matrix for the manufacture of incisors of different profiles. It turned out to be more practical to make a personal matrix for each chisel of a particular profile.
As for punches, for semicircular chisels they are made of round metal rods, forming a pad (lysku) along the entire length of each rod for hitting with a hammer. Knife-shaped plates of the metal used are adapted as punches for «stamping» narrow incisors. For the formation of incisors-corners, large triangular files are often used, in which a notch is ground off. But in mass production, a more «serious» steel than U7 is desirable for such a punch.
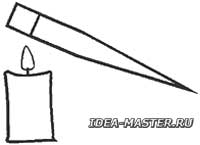 Fig. 7. Vacation on a candle. |
But back to the hardening. Here again it all comes down to the brand of steel. If you come across some kind of «exotic», then you need to find a reference book and dance from the heat treatment modes indicated there. If you prefer to torment a domestic frame saw or a grandfather hacksaw (not very old, though, since they were made of carbon steel before), then again, please heat the cutter to the same 1150 °C. Only this time, do not heat the entire cutter, but only its working part with a length of 20...30 mm, then quickly immerse it in oil, stirring intensively. That's the whole hardening, if you do not take into account the almost glass fragility of your masterpiece. So the hardened cutter is clearly not ready for work, and it needs more vacation. If your «batch» of incisors consists of only one copy, you can release it on a candle. It is enough to clean the convex side of the cutter to a metallic sheen and heat the inner surface of the working part of the cutter in a candle flame. Heating is carried out from the periphery of the working part to the cutting edge up to 300 °C, that is, until the cornflower-blue color of the run. In any case, try to spend a similar vacation. The lesson is fascinating (Fig. 7).
Well, if the batch of incisors is large and there is no thermal furnace with an eternally inaccurate thermometer, they act differently. Prepare a container with mineral oil, load the tool into it and heat it in the usual way to a boil (and this is the same 300 °C). That's all. An excellent, soft and smooth vacation is guaranteed.
Next, the incisors are washed of oil, cleaned of scale, sharpened, brought to mind, the handles are impaled. Our handles are quite versatile, now we use Manchurian walnut wood for them. The handles are beautiful, light, durable, and since the wood absorbs sweat well from the palm, the cutter does not slip in the hand. Wax mastic emphasizes the beauty of the texture of walnut wood.
The crimping rings on the handles are still made of brass, there was an opportunity to put iron factory ones, but they did not want to. Let them be more expensive for us, but the incisors have their own face, recognizable on the TV screen.
Ready the cutter is checked for work in a fairly simple way. If the heat treatment is done correctly, then a good file leaves a barely noticeable groove on the outer (convex) side of the cutter. If not, then the steel is too brittle, so the vacation will have to be repeated. If the file went on the cutter like butter, then it is necessary to repeat both hardening and tempering.
Before sharpening and fine-tuning the cutting edge of the cutters, do not forget to treat the inner surface of the cutters on a polishing wheel with GOI paste to a mirror shine. This is a guarantee that the entire process of fine-tuning will be under control. The sharpening angle of the blade is 15...20°.
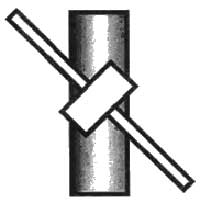 Fig. 8. The position of the «ruling» bearing at an angle to the emery wheel. |
About emery. What to do when a whetstone hits, does not want to «take» even viscous steel, or even «licked» when a neighbor in the garage began to process aluminum on it. Of course, there are special devices to return the stone to working condition, but where are they? Someone tries to fix the stone with a piece of another abrasive, but often as a result the stone becomes even worse. For this purpose, I use an old bearing (ball bearing) number 203 or more, worn on a stick. I turn on the emery, lean the bearing against the stone — dust, screeching, but after 5 minutes everything is ready. Well, sometimes it takes a little more time, but in any case, this event is doomed to success. Just don't be too zealous, as the bearing can fly apart, treating you to a volley of shrapnel. It is possible to press the bearing against the stone and at an angle (Fig. 8).
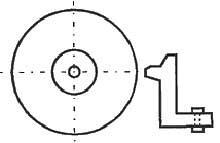 Fig. 9. A large gap appears between the worked-out helper and the emery wheel. |
It is known that a worn—out assistant (Fig. 9) on sandpaper is the cause of injuries, since it can tighten both the part and the fingers into the gap between itself and the stone. For the restoration of such an assistant, the upper part that has worked together is ground off, and instead it is fixed by electric welding (on two...three «potholders») a bar of steel. The bar is fixed by welding, and not by bolts-nuts. After all, after «processing» with abrasive dust and water, the bolts and nuts then simply cannot be unscrewed. Welding is to grind or cut down — no problem.
It also happens that you will put a new circle, dear to everything, you will set it correctly, and the machine starts beating like a fever when turned on, especially after disconnecting. The reason is the heterogeneity of the abrasive mass from which the circle is formed. To eliminate this reason, it is enough to balance the circle by drilling 4...6 holes on its fastening outer flange along the circumference. Next, it remains to cut threads in them and balance the circle by screwing the «necessary» holes into the bolts.
All materials of the section «Ideas for the master»
| Share this page on social networks: |
