Homemade wood lathe from an electric drill. How to make a lathe with your own hands
Electric drill-based lathe
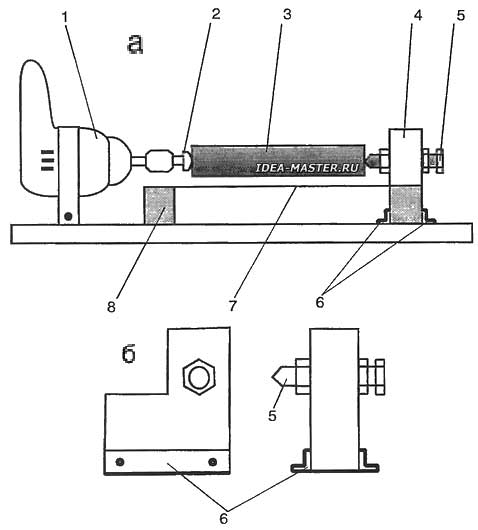
So, let's consider the design of the simplest electric drill-based lathe (Fig. 1).
 Fig. 1. Drill-based lathe: a — general view; b — tailstock; 1 — drill; 2 — leading center; 3 — blank; 4 — tailstock; 5 — center bolt; 6 — corners; 7 — tool holder for the cutter stop (for clarity, the rail is located lower than necessary); 8 — stand for the tool holder. |
As a frame, we will select a smooth dry board with a thickness of 20...30 mm. We will fix a drill at one end of it. At the same time, we recall that the distance from the plane of the board to the center of the drill chuck determines the maximum diameter of the workpiece to be processed. The parallelism of the axis of the cartridge and the plane of the board is controlled using a drill bit clamped into the cartridge and a conventional carpenter's square. Fixing, for example, with a clamp, a drill on a board-frame, we get an almost ready drive.
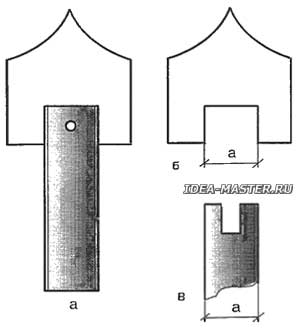
 Fig. 2. The leading center of the machine on the basis of a drill: a — center assembly; b — shaped plate; c — rod with groove. |
We will make the leading center as follows. We will select a screw or just a metal rod with a length of 40 mm and a diameter of 8 mm (the dimensions depend on the drill chuck), as well as a steel plate with a thickness of 2...3 mm. With the help of locksmith tools (hacksaw, files), we will give the plate the shape shown in Fig. 2. Make a longitudinal groove in the body of the rod under the plate and connect both parts with screws or rivets. We clamp the free end of the rod in the drill chuck. That's it. The lead center is ready. Next, we mark the center at the end of the wooden billet, prick it with an awl, and then, according to the mark at the end of the billet, we make a shallow cut with a width corresponding to the thickness of the plate. We insert the center into the resulting groove and clamp the workpiece using the tailstock (see Fig. 1). The design of the tailstock is quite simple. We cut out a wooden block of suitable sizes, prepare two metal corners and, placing the corners and the bar on the board, mark the holes for screws on the latter (make holes in the corners in advance), with which we screw the corners to the bar.
Next, we will clamp a drill bit in the drill chuck, already fixed on the base board, whose diameter is 1 mm smaller than the diameter of the future bolt center. Moving the bar with the corners on the board, drill a through hole in the bar. At the same time, of course, the drill must be strictly perpendicular to the plane of the bar. At the end of the center bolt, using a file or an electric sharpener, we form a cone. Having installed a nut with a washer on the center bolt, we will wrap it in a hole in the bar (if there is a corresponding tap, then they can be pre-threaded in the hole). We will install another washer and nut on the center bolt. The center is ready.
Tailstock lathes are attached to the board with screws through holes in the corners. At the same time, you will first have to check the position of the headstock relative to the axis of the leading center, but in the future the installation can be carried out through the holes left from the screws in the board (the position of the tailstock is determined by the length of the workpiece). The stop for the cutter in our machine will rest on the protrusion of the tailstock and on a wooden rack mounted on a board near the leading center (see Fig. 1). A metal plate or even a wooden rail will be suitable as a stop. Fasten the stop to the supports again with screws.
For a more convenient wood lathe design, see here. Also see the article About the wood lathe.
All materials of the section «Ideas for the master»
| Share this page on social networks: |
