How to make a cinder block — a simple method and technology for making cinder blocks with your own hands
In the construction of a garage, residential building or other utility buildings for the construction of walls the cheapest building material are cinder blocks. They are made almost from waste material. At the same time, cinder blocks are laid in the walls not only on sand-cement mortar, but also on clay mortar, which additionally reduces the cost of construction.
Technology of self-manufacturing of cinder blocks
Different firms in the country produce this simplest building material, but they all make cinder blocks of almost the same size, and these blocks are very bulky and heavy. In my opinion, laying out the walls of them, the master feels some inconvenience in his work.
Having undertaken to form cinder blocks, I decided right away that they should be slightly larger than ordinary red bricks, that is, somewhat smaller than ordinary cinder blocks. The dimensions of my cinder blocks are 140x140x300 mm. They are very convenient to work with, it is a pleasure to stack them. As is known, for the production of cinder blocks, mainly furnace coal ash or slag from boiler houses are used, which, mixed with cement, give a durable construction product.
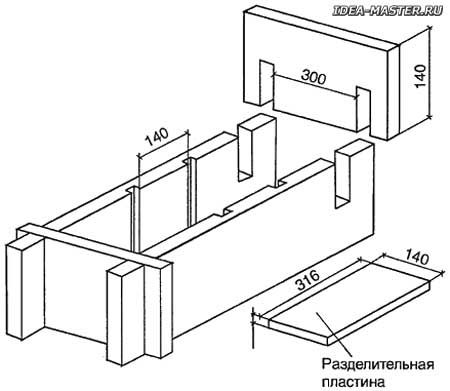
To make cinder blocks, you will have to make a mold. I have already indicated the dimensions of my cinder blocks, but everyone is free to determine their size. The simplest form, which I was most satisfied with, I made as follows. I picked up planed boards with a width of the height of the cinder block (140 mm). The length of the board should be no more than 2 m, since it is more difficult to work with a longer form: you have to make a lot of unnecessary movements. But it's a matter of taste. Next, crossbars are needed. The two extreme crossbars are connected to the longitudinal boards «on the sliding grooves» (Fig. 1). On the inside of the longitudinal boards (between the crossbars), cross grooves with a depth of 7...8 mm are formed every 140 mm with a hacksaw and chisel. The width of the cut depends on the thickness of the separation plates made of sheet iron, textolite, getinax. Plates made of other durable sheet material will also work, as long as it is smooth enough. From Fig. 1 it is clear how to make a mold. It takes a long time to describe it and there is no point, only one thing I want to say is that the finished form is placed on an absolutely flat surface before pouring the solution into it. All parts of the mold made of wood should preferably be painted with any oil paint, which will ensure easier removal of cinder blocks from the mold. Every time before pouring the solution into the mold, all its internal surfaces are wiped with salt oil (diesel fuel) or used engine oil. Wipe lightly, not abundantly.
 Fig. 1. Form for three cinder blocks. |
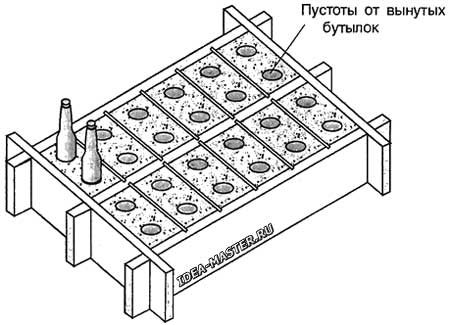
In order to reduce the consumption of the solution, and the cinder blocks turned out to be light and with voids (and this is additional heat in the room), the molds are filled with a solution up to half, after which champagne bottles are pressed into the solution (Fig. 2). If, after installing the bottles, the solution level rises insufficiently, the required amount of solution (up to the top of the form) is added with a trowel. After 2...3 hours. the solution will settle significantly and get stronger, then the bottles are pulled out, carefully turning them around the axis, and immediately washed with water, otherwise the solution will stick firmly to them and the bottles will be unsuitable for further use.
 Fig. 2. A form filled with a solution. |
The process of removing cinder blocks from the mold is very simple. Just lightly hammer the shape around the perimeter and disassemble it. It is easy to separate the side boards, but it is somewhat more difficult to remove the dividing plates. You will have to carefully hammer the protruding plate from above and slightly sideways.
Every day, that is, after 24 hours, I took out the almost strengthened cinder blocks from the mold and poured the solution into it again. I did not apply any compaction of the solution with a tamper or with the help of vibration.
A few words about the solution. Despite the fact that it was quite liquid, the cinder blocks, after appropriate exposure, acquired such strength that they could then be split or cut with the greatest difficulty.
For one part of the cement of the «400» brand, I took 9 or even 10 parts of slag. There was no marriage. Why did I tell you this? Yes, in order to quickly produce a solid number of excellent quality cinder blocks with just a few molds. I made cinder blocks in the evening after work every day, and I will say that this work was not a burden to me. I don't have a concrete mixer and I mixed the mortar manually in a 300 l pallet. Well, if you work together, everything will turn out effortlessly.
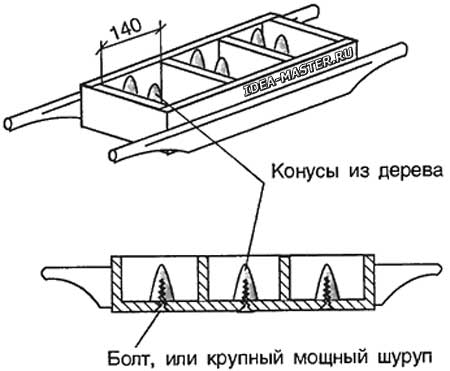
Of course, all of the above can be recommended for small amounts of work. But if you need to make a lot of blocks, and as quickly as possible, a slightly different technology is needed. At least two workers will have to make cinder blocks in such a situation. When preparing a solution, you cannot do without a concrete mixer, since the solution must be very thick. The ratio of cement and slag here is 1:8. At the same time, for the formation of cinder blocks, it will be necessary to produce several forms, and of a different type. In essence, each form has the form of a stretcher designed for the «casting» of 3...5 cinder blocks (Fig. 3). Just keep in mind that too large forms-stretchers for 6...8 blocks will be difficult to carry. How to make such stretcher forms, each master will decide at his discretion.
 Fig. 3. Stretcher form. |
At the bottom of each mold cell, two cones are firmly reinforced, which is necessary to create hollow cinder blocks. Such stretcher forms will have to be made several. Stretcher forms filled with solution are placed on a vibrating table to seal the solution. While some forms with a solution are exposed to vibration, a solution is laid in empty forms. The tamping time on the vibrating table is not very long, about 3...5 minutes.
Rammed cinder blocks are shaken out of the stretcher into an empty space on the site by tipping over. If the inner surfaces of the mold are smooth enough, the cinder blocks freely crawl out of the molds and do not lose their shape, but they must be shaken out carefully. It is impossible to rearrange the blocks on the site, since the solution is still weak. But after a few hours, the blocks will be ready for transportation or storage in a stack. The released forms are first washed with water, dried, and then lubricated with salt oil.
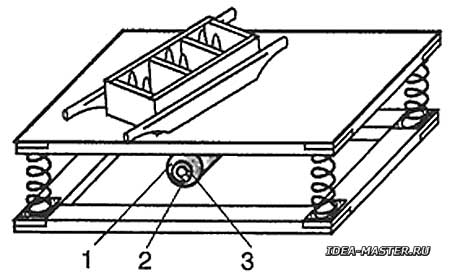
In conclusion, a little bit about the design of the vibrator table, the basic structure of which is clear from Fig. 4.
 Fig. 4. Vibrator table: 1 — electric motor; 2 — unbalancing load; 3 — pulley. |
I deliberately do not give the dimensions of the table here, as they depend on the materials you have and your own imagination. In any case, it will turn out to be a very reliable installation. I took the springs for the vibrator table from a motorcycle (springs from an industrial fan or any moped will also work). The electric motor is attached to the bottom of the countertop exactly in the center of the table. A pulley is put on the shaft of the electric motor, on the edge of which there is a load that violates the balancing of the pulley, which ensures the vibration of the engine. The cable connected to the table must be well insulated. Make sure that it is not accidentally crushed or cut off with an abandoned shovel.
In the section «Repair and construction»
| Share this page on social networks: |
