How to make a smoker yourself. Homemade smoker for cold smoking products at home
Small-sized smokehouse for cold smoking
 Before proceeding to the description of a homemade smokehouse for cold smoking products at home, I want to remind you that there are quite a lot of ways and types of food processing by smoking. The main method of smoking is smoke, but there is also a smokeless method of smoking — in special smoking liquids. Dipped a fish in a similar liquid, and that's it. And there are two main types of smoking: hot and cold. In general, hot smoking looks quite simple: I fished out a carp, salted it, put it on a skewer from a twig and put it in the smoke of a «raw» fire. Half an hour later, I took a hot smoked carp off the skewer. That's the whole technology. Pour and have a snack. Cold factory smoking is a bit more troublesome. It takes a lot of time (up to 15 days), which is always not enough for fishing. When smoked hot, the product is cooked, when cold, it remains raw. The hot-smoked product cannot be stored for a long time, even in the refrigerator. Cold smoking allows you to prepare the product for the future. As you can see, both types of product processing have their disadvantages and advantages. I still prefer cold smoking to hot, although the first process is much more complicated. After all, cold smoking requires equipment, time, cold smoke, the temperature of which, when it enters the smoking chamber, should not exceed 30 °C, so that the smoked products do not boil. By the way, as already mentioned, cold smoking not only gives the product a specific taste and aroma, but also preserves it. The fact is that when smoked, the product is partially dehydrated, while the smoke has bactericidal properties, killing bacteria and other microorganisms. Even representatives of piercing-biting evil spirits (mosquitoes, midges, spiders and similar insects) as devils of incense are afraid of smoke. And a person, once in the smoke, does not laugh with pleasure, but bursts into tears. But it is better to fumigate yourself with smoke and cry than to be eaten alive by mosquitoes. Therefore, when you come home from fishing, my wife wonders why I smell like a smoked roach.
In general, both types of smoking are good, but only cold smoking allows you to prepare products for the future. From the book «Home Economics» I fished out some details of smoking. So, the duration of smoking is from 1 to 15 days. The smoking time depends on the type of product, its mass and the period of its further intended storage. For example, 15-day smoking of meat products increases their shelf life to 3 years. In the same book, recipes for various smoked meats are given and some designs of home-made smokehouses are given, which, however, caused me to doubt their ability to perform their duties qualitatively and struck me with their primitive design. I was especially frightened by the duration of smoking. And then, on duty, I was brought to the fish factory, where I personally saw the entire technological process of smoking. At the factory, the smoking line was located in a huge metal box — a room about 50 m long, if my memory does not change. Suspended trolleys with fish carcasses moved along the monorails in several rows around the room. The iron floor in the room was covered with smoldering sawdust. The smoking process was carried out there continuously. The time spent by the trolley loaded with fresh fish in the smoking room depended on the specified fish processing program and was several days. After this tour, my dream of a home smokehouse melted away like fleeting smoke. Well, how to get cold smoke at home and even hang out at the smokehouse for several days? During this time, you can make a whole entrance of enemies from among the neighbors and break up with your wife twice. No, I thought, nothing will come of this venture.
But I still wanted smoked fish. Of course, homemade dried fish outside the window is very tasty, but smoked is still better. His own, of course, and not purchased poison. Well, I was haunted by thoughts of smoked fish. So, one day on a fishing trip I remembered about the smokehouse described in «Home Economics». On a steep bank perpendicular to the river, a trench is dug with a section of 40x40 cm and a length of 4...5 m. From above, the trench is covered with green branches and branches and sprinkled with a layer of earth, getting a chimney. A smoky fire is lit at the beginning of the chimney, and salted fish is hung on branches from its other end. I spent half a day on the construction of this smokehouse, but the work was in vain. The smoke did not want to climb into the trench turned into a hole in any way — there was no traction. It must have been a windless day. I never managed to taste the smoked delicacy.
Another time I was fishing on my favorite lake, where an ancient birch tree grew in two spans. The birch was notable for the fact that its trunk was hollow. Apparently, once during a thunderstorm, lightning chose her from all the surrounding trees, piercing through the trunk. The birch clump was torn apart, so that a hollow was formed in it, where an adult could fit freely. Deciding to test my assumption, I lit a small fire in the hollow and threw raw branches into it. Soon, smoke appeared over the top of the birch tree. My assumption was confirmed — the hollow turned out to have a chimney. I want to say that at the bottom of the hollow I once dug a hole and stored there a knife, a spoon, a pot, cereals, salt, pepper, lavrushka and other fisherman's belongings. Every time after fishing, I put my stuff in a hole, covered it with branches, dry leaves and sprinkled it with sand until the next visit to the lake. This is the hollow I decided to use as a smokehouse. At a height of 1.5 m, he strengthened branches in a hollow, hung salted roaches, lit a fire, sketched green branches and herbs, waited until a smoke appeared from the top of the birch tree, and went to the fishing rods in anticipation of the expected delicacy - smoked roach in the bosom of nature. It was pecking fine, so I kept my eyes on the float, forgetting about everything else. And suddenly I heard a noise behind me, similar to the hiss that the lowering camera of a soccer ball or a car wheel makes. Looking back, I involuntarily looked at the top of the birch tree and saw clouds of smoke escaping from the hole in the trunk. Well, just like from a small volcano. With fright, the thought worked like lightning: after picking a bunch of grass, I plugged the hollow from below. The thrust stopped, and the volcano calmed down. The main thing is that the birch did not catch fire, which I was most afraid of. The reason is clear: the trunk warmed up, the branches on the fire dried up and caught fire, the thrust increased and the trunk of the birch turned into an air tube. In short, smoking had to be stopped. However, I found a few fish knocked off the branches in the sand, washed and ate them. They were already baked and smelled pleasantly of smoke. Flavored with a stack of «Stolichnaya» ordinary roach seemed to me amazingly delicious! Then I looked at the top of the birch tree for a long time, thinking about what could have happened if I hadn't extinguished the fire. So don't repeat my mistake.
But still, the dream of a home smokehouse did not leave me. And the episode when I first saw a real home smokehouse came up in my memory more than once. It happened during the Great Patriotic War. During the redeployment of military units, our unit was brought to the German village of the Volga Germans. The village struck with its thoughtful, clear layout. There was one asphalt street in it, wide as an avenue. There were no houses visible from the street. They were hiding behind thick fruit trees, standing in a green wall on both sides of the street. Behind the houses there are well-groomed and neat vegetable gardens, ready for harvesting. Carrots are like beets, tomatoes are the size of a child's head, you can sit cross-legged on a pumpkin and drink tea. The oppressive silence was striking. All residents were evicted from the village. We settled down in empty houses, where furniture, dishes, and other household utensils were preserved.
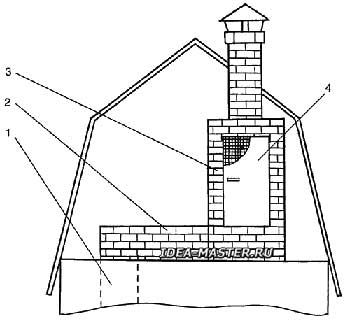 Fig. 1. Smokehouse in the attic: 1 — vertical section of the chimney; 2 — horizontal section of the chimney; 3 — smoking chamber; 4 — door. |
This is the background of my smokehouse. After all, I couldn't stand the temptation to make a homemade pocket smokehouse and started experimenting in the kitchen. The main thing, I thought, was to get a stream of cold smoke, and the rest didn't bother me very much. I intended to break the whole smoking period into parts. Today I smoked 3 hours, and tomorrow — 4 hours, and so on, until the product gains the necessary degree of coloring. To get cold smoke, I first wrapped the chimney with a wet cloth, which I periodically moistened with water. The cooling effect was achieved, but it was such a primitive thing! After all, I, as a criminal, literally found myself chained to the cooling pipe. I missed a little, the rag dried up, hot smoke went into the smoking chamber and pressed the tails of the bream. I think there is no need to describe all the stages of improving the smokehouse, so I will tell you here only about the final sample. I named my smokehouse «Sinets» — the name of the fish whose batch was the first to get into the smokehouse. So, the pocket smokehouse «Sinets».
Construction and operation of a smokehouse (smokehouse)
The «Sinets» smokehouse is designed for cold smoking of products (meat, bacon, fish, cheese) in a small-sized city apartment. At the same time, it is easy to install it in any room, even outdoors in the yard or in the field. Since the dimensions of my smoker are determined by the dimensions of my kitchen with a two-burner stove, I do not give the overall dimensions of the «Sinz», since they are not mandatory for everyone. Also, the dimensions of individual components and parts are not required, which depend solely on the operating conditions of the smokehouse. So consider my dimensions in the drawings as reference. Now about the design of the smokehouse, the general view of which is given in Fig. 2.
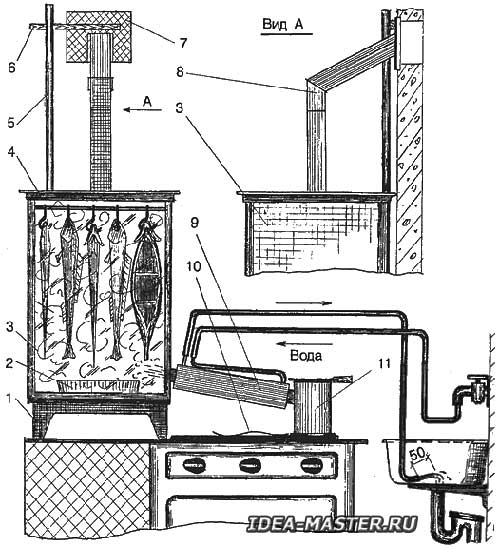 Fig. 2. Smokehouse «Sinets»: 1 — stand; 2 — cup of water; 3 — smoking chamber; 4 — chamber lid; 5 — gas pipe (for pipe); 6 — wedge; 7 — flap; 8 — chimney; 9 — cooler; 10 — safety plate made of tin; 11 — stove with lid. |
A gas two-burner stove has a stove for producing smoke, covered with a lid. The source of the smoke is crushed wood loaded into the furnace. The smoke is obtained by dry distillation. The heat source is a gas stove burner. Hot smoke from the stove is sent to the cooler, where it acquires the necessary temperature under the influence of the circulating water flow in the cooler casing. Water from the water tap enters the cooler and flows out of it into the sewer through rubber tubes. The cooled smoke fills the smoking chamber, which consists of a smoking tank with a lid. In the tank, with the help of hooks, the fish is suspended on a crossbar. To maintain humidity in the smoking chamber, cups with water are placed at the bottom of the tank. The exhaust smoke from the chamber passes through the exhaust pipe into the natural ventilation channel of the kitchen. To eliminate unwanted air suction through the gaps between the chimney and the vent window, I cover the latter with an auxiliary flap with a cutout for the pipe (I press the flap against the wall with a wooden wedge inserted between the gas pipe and the flap). The smoking chamber holds up to 20 kg of raw products. The duration of the smoking cycle is up to 8 hours. Pay attention to this indicator. At the fish factory and in «Home Economics» smoking lasts for days. This scared me away from creating a home smokehouse. How I managed to shorten this cycle, I will tell below.
The consumption of wood for one smoking cycle will be 0.5...0.8 kg. It is clear that the amount of wood used depends on the duration of the smoking cycle and the type of wood. The denser the wooden blocks, the less they are required. All types of wood species are suitable for smoking, with the exception of resinous ones, since the latter give the smoked products an unpleasant taste and smell. Birch (without bark) gives a thick, fragrant, persistent smoke with a barely perceptible pleasant smell of tar. The smoke from the bitter aspen provides the fish with a delicate and delicate aroma. If aspen chocks behave «frivolously» in the stove, crackle, flare up when not necessary, then the behavior in the oven of solid oak and beech is also solid: they smolder evenly, for a long time, the aroma of smoke is pleasant and persistent.
Making a smokehouse
The construction of a smokehouse at home will not be difficult in the presence of some tools and materials: drills, soldering irons, vises, metal scissors, roofing or tinplate, metal corners, plastic, cardboard, rubber or plastic tubes and other small things. I just want to remind you once again that all the dimensions of the nodes and parts of the «Sinz» are due to the dimensions of my kitchen. And if there is such an opportunity, install the smoking chamber away from the gas stove, which will make it easier for you to operate it. A large room will allow you to increase the size of the smoking chamber, and hence its performance. And let the dimensions I have given serve you for reference.
Stove
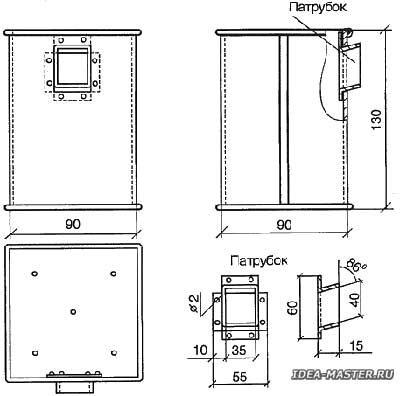 Fig. 3. The design of the stove, as well as the design of the pipe for the smoke outlet (in the lower right corner). |
The stove, the details of which are shown in Fig. 3 — is a producer of smoke for smoking. Please note that the smoke must be obtained as a result of flameless burning of wood, which is loaded into the furnace in the form of small chunks of 5x5x50 mm in size.Gorenje The fact is that during flameless gorenje, that is, smoldering, the resulting smoke is saturated with vapors of essential oils, resins, acids, which are necessary for smoking products. The more saturated the smoke is with these components, the more intense the smoking process is. And now a few words about gorenje — the reaction of a substance (firewood in our case) with an oxidizer (oxygen of the air), accompanied by the release of heat. Obviously, Gorenje gorenje without air access to the wood, neither burning with flame nor burning without flame (smoldering) will happen. It is also clear that less oxygen is required to maintain the smoldering of firewood than to ensure gorenje with a flame. Therefore, in our case, there is a need for a metered air supply to maintain the decay of wood in the stove. First, I adjusted the required amount of air entering the furnace with the lid of the furnace, with which I created the necessary gap for air. But this method of adjustment required increased attention. If you increase the gap, the intensity of smoldering increases, further turning into gorenje. If you reduce the gap too much — the process of decay will stop altogether. And you're rushing around like a squirrel in a wheel. The most unpleasant thing is that all the time you are in a state of tense expectation, as if not to miss the moment of ignition. Sometimes, from a careless movement of the hand or vibration from cars passing by the house, the roof (that is, the lid) literally goes to the stove, and an extra portion of oxygen rushes into the stove through the increased gap, causing a fiery fire of firewood. Conversely, if the gap closes spontaneously, the furnace goes out. But one day I came up with the idea to make «grates» for the furnace with holes for metered air intake. I punched one hole in the bottom of the stove — it turned out to be not enough. Two is also not enough. But five holes with a diameter of 2 mm were enough. When the holes are clogged with ash or coal during operation, it is enough to remove the lid and poke the chocks with a wire poker or just knock on the bottom of the stove. The ashes will wake up, and the decay will resume. A short-term ignition of chocks for smoking is not terrible. It is necessary to beware of the continuous hot stream of smoke that occurs during the flaming burning of the chocks. gorenje. After all, in this case, the process of already hot smoking will begin.
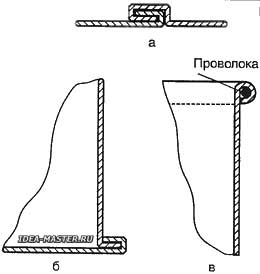 Fig. 4. Technological techniques used in the manufacture of the stove: a and b — connection using a fold; c — stiffening the stove body with a wire ring. |
I made the first stoves from different cans, and one of them was from a gas mask jar. During operation, it turned out that the condensate formed in the inner pipe of the cooler, due to the inclination of the latter, flows into the furnace. The condensate turned out to be an aggressive substance and significantly accelerated the process of corrosion of the furnace metal. As a result, the pipe and the bottom of the furnace collapsed quite quickly. It turned out that the walls of the oven from the tin can are very thin — only 0.25...0.35 mm. Therefore, I made the last stove from roofing tin with a thickness of 0.5 mm. By the way, even if the bottom of the stove burns out, I do not throw out the stove, but cut out a new bottom with a slightly smaller diameter and put it inside the stove. Such a new bottom can not be changed until it begins to fail. The bottom of the stove is usually enough for a year or two of work.
So, I made my last stove out of tin roofing. From Fig. 3, the furnace manufacturing technology is quite clear. I bend the furnace body from a single piece of sheet and connect the edges of the sheet into a seam (Fig. 4, a). If the metal sheet is too thick, it is easy to connect the corresponding edges with rivets. You can also attach the bottom to the body (Fig. 4, 6). Do not forget only to cut a hole for the pipe before bending the body in the workpiece, the manufacture of which will be described below. If the metal sheet for the housing is too thin, it is not superfluous to strengthen the upper edge of the housing with a wire ring (Fig. 4, c). The workpiece for the bottom of the stove (with grate holes) is shown in Fig. 5.
The lid of the oven gets very hot during its operation, so the handle should be made of wood or a material with poor thermal conductivity: Chipboard, fiberboard, carbolite (fig. 6).
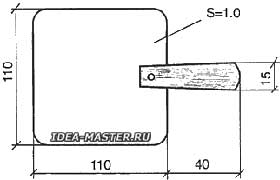
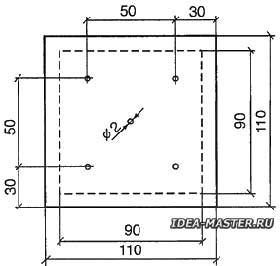 Fig. 5. Blank for the bottom of the stove. |
|
If you don't want to make the oven yourself, pick up any tin can. The lid of the stove is made of the same sheet of metal as the housing. Although it is not forbidden to use ceramic tiles as a lid.
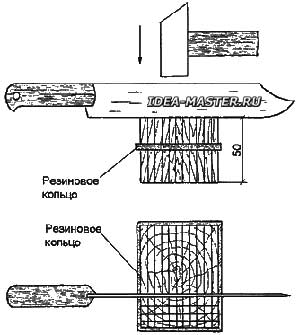 Fig. 7. The blank of the chunks. |
To load the stove with firewood, the latter must be crushed. Splinters and sawdust, if any, are also suitable. Personally, I use dried grass from urban plantings, wooden boxes, furniture thrown into the landfill. From all this stuff I choose oak, beech, fir, aspen, birch, ash, maple, poplar, elm. In no case do I use pine, spruce, fir and cedar for smoking. I prepare firewood for the stove like this. From trunks, knots and boards, I file logs with a length of no more than 50 mm. If the boards from the furniture are used, then first I remove (cut down) the varnish and paint from them. Next, using a hammer and a knife, I chop plates with a thickness of 5...8 mm from the logs, and already from these plates I prepare chopsticks with a cross section of 5x5 mm. First I cut these chopsticks with a knife. However, such a process of getting chocks was very tedious and unproductive. I was so sick of this work that one day I put a rubber ring from the bicycle camera on the block (Fig. 7). I put it on and was surprised — how simple everything turned out to be. During the chopping, the Chouchkas remained standing at attention and did not fly anywhere. The harvesting of churochek has become an interesting and productive business.
Smokehouse cooler
One of the main components of the smokehouse, which requires care and scrupulousness in its manufacture, is a cooler. The smoke from the stove, passing through its inner rectangular pipe, is cooled to an acceptable temperature (no higher than 30 °C). The cooler (Fig. 8.) consists of a chimney pipe enclosed in a blind rectangular casing. The water entering the casing washes and cools the inner pipe and, accordingly, the smoke passing through it. Many, dealing with the drawing in Fig. 8, they will think: isn't it easier to put a straight pipe instead of a branch pipe in the form of a curved tube through which water from the tap enters the cooler casing. Of course, it's easier, but I have this pipe next to a hot stove, so the rubber tube put on the short inlet pipe will definitely burn. Therefore, the place of connection of the rubber tube to the metal inlet pipe had to be shifted closer to the drain pipe, where it is cooler. In general, the longer the length of the cooler, the better it performs its functions. And with some sufficient length of the inner pipe-chimney of the cooler, the latter will not need a water jacket. Natural air cooling will be enough. For example, you can increase the length of the inner pipe of the cooler by making it from several knees or twisting it into a spiral. But condensation prevents this. The fact is that during the passage of gases on the walls of the pipe, condensate is formed from a mixture of resins and water, which gradually flows down the inclined pipe-the chimney of the cooler into the furnace, where it burns. Part of the condensate, of course, after the end of smoking remains on the walls of the pipe and it should be immediately removed, because it will harden, worsen the thermal conductivity of the walls of the pipe. In fact, uncured condensate is easy to remove with a dish brush and a solution of soda ash with the addition of gasoline, turpentine or similar solvents. But this is easy to do with a straight tube. And how to drive a ruff into a spiral or a crankshaft pipe? That's it! The length of the pipe, as you can see, my cooler is small, but, as they say, «I would be glad to go to heaven», but the wall of the kitchen does not let me move the smoking chamber away from the gas burner of the stove. However, even in this form, my cooler copes well with its duties.
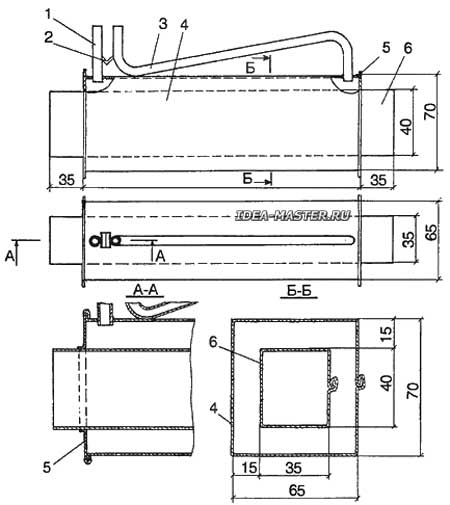 Fig. 8. Cooler design: 1 — outlet pipe; 2 — bracket; 3 — inlet pipe; 4 — casing; 5 — end wall; 6 — inner pipe. |
I made my cooler out of galvanized tin roofing. The pipe, like the casing, was bent out of a solid blank, and the edges were connected with a bending seam (a simple recumbent seam), carefully soldering the seam on both sides. (For the cooler, you can also pick up two thin-walled round pipes of the appropriate diameter, and weld the end walls to the casing pipe by welding.) After manufacturing all the parts in the casing housing, holes are drilled for straight and curved pipes, which are inserted into the holes so that the pipes enter into the casing by 2...3 mm. After that, the contact points of the nozzles with the casing are soldered on both sides. For rigidity, a tin bracket is soldered between the nozzles (see Fig. 8).
In the cut-out blanks of the ends of the casing, holes are cut-windows for the inner pipe. I note that the dimensions of the holes are slightly smaller than the outer dimensions of a rectangular chimney pipe, which allows you to adjust the holes for the pipe by bending the edges of the hole when assembling the casing. The blanks of the ends of the casing, on the contrary, are made with an allowance, so that later it is possible to connect the ends to the cooler body by forming a simple fold (see Fig. 4). Having sealed the seams and gaps, the joints are thoroughly soldered, after which the cooler is tested for tightness. To do this, one branch pipe of the cooler is connected to the tap of the water pipe, and the other branch pipe is clamped with a finger. The revealed fistulas are eliminated by soldering. When checking the tightness of the casing, do not forget that the pressure in the water supply network, if I am not mistaken, is about 4 atmospheres, so in all cases it is necessary to let the water into the cooler smoothly. When smoking, it is necessary to adjust the water flow so that the straight section of the jet flowing out of the nozzle is no more than 4...5 cm.
Smoking chamber
In the smoking chamber, the mystery of the transformation of a simple fish into a golden one with a wonderful color and incomparable smell and taste is performed. The camera consists of a tank and a lid (Fig. 9). It is not difficult to make a camera. But I want to warn all home-made people: before doing any thing, think and look for something ready-made that is easy to adapt for the intended purpose. For the camera, for example, a metal barrel, tank, can, box are suitable. In extreme cases, even wooden and cardboard containers will do, but I do not advise contacting them, because when smoking we will be dealing with an open flame of a gas burner of a kitchen stove. I built my camera out of 1-millimeter duralumin sheets purchased for pennies at the Young Technician store. It was back when there were no «metalheads» in Russia, and there were normal people around. Now I consider roofing or tin tin to be the most affordable material for making a smoking chamber. As mentioned above, I picked up duralumin sheets for my camera, which I fastened with aluminum corners and rivets.
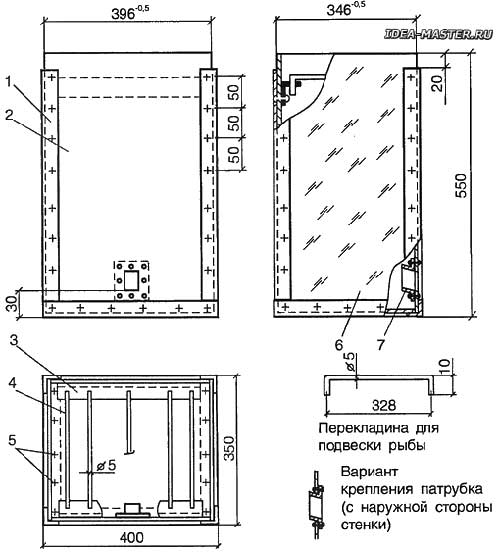 Fig. 9. Smokehouse chamber: 1 — aluminum corner 20x20x2 mm; 2 — front wall; 3 — shelf for installing crossbars; 4 — crossbar; 5 — rivets; 6 — side wall (transparent); 7 — pipe. |
One of the walls was made of a 4-millimeter sheet of transparent plexiglass. Instead of plexiglass, window or showcase glasses will be suitable, but it will be more difficult to fix them. You can do without a transparent wall, but it is still better with it, since it is possible to directly observe the process taking place inside the smoking chamber and adjust it accordingly. So, visually it is possible to determine, for example, the degree of readiness of the product.
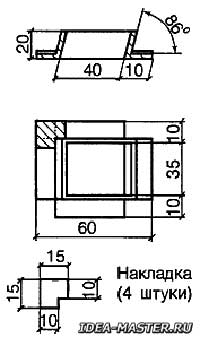 Fig. 10. Pipe of the smokehouse chamber. |
At the bottom of one of the side walls, a quadrangular hole is made for the entry of smoke and even before the assembly of the smokehouse, a tin can pipe is inserted into it. The pipe is made like this. Take a strip of tin, bend it around the inner pipe of the cooler and solder the edges of the strip directly on one of the walls of the pipe. The width of the tin strip is 30...35 mm. At the resulting rectangular pipe on one side, we make cuts along the edges to a depth of 12 mm. Next, «wings» are formed at the end of the pipe, bending the cut parts of the wall. At the end of the branch pipe, the bent wings form a cross, as shown in Fig. 10. On the face (wall) of the branch pipe with a width of 35 mm, one wing with a width of 10 mm is bent, and the other with a width of 12 mm. At the same time, the 10-millimeter «wing» is bent at an angle of 86°, and the 12-millimeter one is bent at an angle of 94°. It is at this angle that the cooler is located in the smoking unit so that the condensate formed in it flows into the stove by gravity. After that, the «wings» are bent at the edges with a width of 40 mm, orienting all the «wings» in one plane to form a cruciform flange.
To give the cruciform flange of the pipe the shape of a rectangle, square plates of 15x15 mm with a rectangular cutout are cut out of tin (see Fig. 10) and solder on the corners of the flange from the «wings». The finished pipe is placed inside the smokehouse, fixing the pipe flange either on the inside of the wall or on the outside (see Fig. 9), and are connected to the wall by rivets. It is clear that the rivet connection is not sealed, but tightness is not required here, and a possible air suction is even useful. The air flows entering the smokehouse through the cracks from different sides help to distribute the flow of smoke coming from the cooler throughout the entire volume of the smokehouse. It would be nice to make several closing holes in the walls of the smokehouse, with the help of which, with good traction, it would be possible to control the flow of smoke. After all, the turbulent (disorderly) movement of smoke contributes to the better enveloping of products with smoke, while the smoke penetrates into the dead zones of the smokehouse, usually located in its corners and nooks.
But when making the smokehouse case, one condition must be met by all means: the lower part of the case is 20 meters high 30 mm should be sealed. The fact is that when smoking on the walls of the smokehouse, although in a small amount, condensation forms. The walls are sweating, drops of condensate drain to the bottom. There are not many of them, but they are the fly in the ointment, which is not needed at all in a barrel of honey. Seeping through the leaks in the housing, condensate drips onto the table, onto the floor, and if these drops are not removed in time, coffee-colored stains remain hard to remove from them. Usually I achieve the tightness of the case with the help of glue «Moment», filling them with the places where the parts are interfaced. Instead of the «Moment», any waterproof glue or putty will do.
For fire safety purposes, it is better to attach a spark extinguisher cap made of metal fine mesh to the hole in the smokehouse through which the smoke enters. But I have been without a spark extinguisher for 7 years now. As long as God has mercy. After all, when you screw in the stove with a wire rod-poker, you can see that the stream of smoke carries sparks with it. But in my opinion, they do not go further than the tank (during the cleaning of the grates, I specially disconnected the sections of the exhaust pipe and watched the smoke through the crack, but I did not notice any sparks there). But it's still better to hedge and make a spark extinguisher. And then you'll go out for cigarettes, and at this time, take a spark and slip through the pipe into the chimney, that is, into the ventilation unit. There is also a dried-up mummy of a pigeon or a newspaper (or a rag) that came from nowhere. Then turn the dial of the phone, dial 01. When the smokehouse is installed in the courtyard of the estate or cottage, you can not do without a spark extinguisher. So it's better not to tempt fate, it's calmer for yourself, and even more so for the neighbors.
Cover design the smokehouse is shown in Fig. 11. I made it from a duralumin sheet and a corner of 20x20x2 mm, and the nozzle on the lid was made from tin tin (Fig. 12). A section of the exhaust pipe is put on this pipe when smoking.
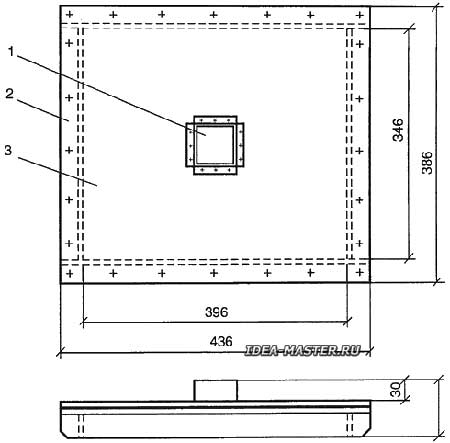 Fig. 11. Smokehouse chamber cover: 1 — pipe; 2 — aluminum corner 20x20x2 mm; 3 — duralumin sheet. |
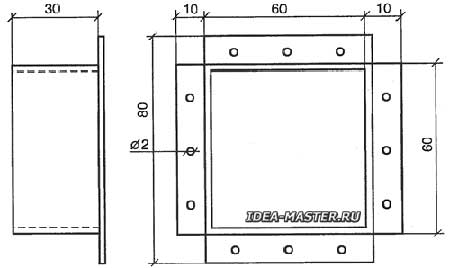 Fig. 12. Pipe of the smokehouse chamber cover (fold connection is not specified for simplicity). |
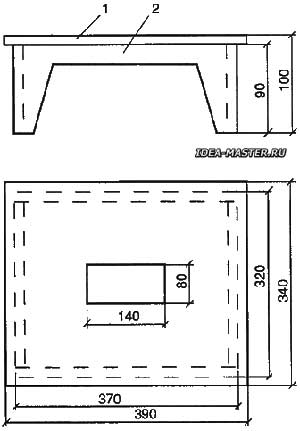 Fig. 13. Smokehouse camera stand: 1 — plywood sheet; 2 — legs. |
The purpose of the stand is to lift the smoking chamber to ensure that the cooler is tilted to drain condensate from it. Actually, any suitable object will do as a stand. But in order not to fuss every time in search of this object, I made a special stand of 10 mm plywood (Fig. 13). Sanded it, painted it with oil paint.
And now it's time for a little lyrical digression. We will not part with the technology of the blunder in any way. We do not follow the design, we do not catch extra millimeters, we blurt out everything «by eye». Therefore, our products are often awkward, bulky, rough, clumsy, and as a result do not paint the interior of the home at all. So, in home craftsmanship, this attitude is unacceptable. Of course, instead of my «Syntz», you can take a rusty barrel, punch a hole in it with an axe, put a piece of rusty pipe in there and ignite the manure. And surprisingly, this pile of scrap metal will work and produce quite edible products. But a person should not live with a single edible product. He needs food not only for his stomach, but also for his eyes and for his soul. You will not wipe your feet on a beautiful thing, but you will approach it on tiptoe, you will not throw garbage on a clean, well-groomed street. A beautiful car is not only pleasing to the eye, it is a pleasure to drive on it. It is known that about 50% of the cost of some thing is the cost of developing its design. Therefore, for example, if the inlet pipe for supplying water to the cooler of our smokehouse is bent through the knee, it will spoil the entire appearance of the cooler, and with a sharp bend of the pipe it is easy to block the inner passage. But if you bend the pipe with smooth transitions, and even reminiscent of the curves of a woman's waist, the cooler will be elegant and technologically ideal. Of course, I'm lying a little, but it's true. It's no secret to everyone that 90% of our products cannot make their way to the world market because of the ugly design. Although usually all these products are indestructibly strong. In a word, things should be done so that even at the end of their life it would be painful and a pity to part with them.
Exhaust pipe
The very name of this pipe indicates its purpose. The exhaust pipe can be made of a variety of materials: soft tin, aluminum foil-covered cardboard or thin plywood, etc. If you live on the top floor of the house, the pipe is often taken out into the window pane. The pipe of my smokehouse drains the exhaust smoke into the natural ventilation channel in the kitchen. For convenience of storage, the pipe is made of two sections. Obviously, the length of the pipe and its configuration depend on the characteristics of the room, or rather, on the place where the ventilation hole is located. Usually there are gaudy plaster grilles-dust collectors on the air vents. Get rid of them. There are some good plug-in plastic grilles. Before work, I take out such a grate from the ventilation hole so as not to smoke it.
The exhaust pipe of my smokehouse consists of two sections: L-shaped and straight (Fig. 14). They, like the cooler pipes, are made of tinplate and also have a rectangular cross-section. At the end of the L-shaped section, two corners are soldered, which together with the bent edges of the section walls form grooves with the corners on both sides of the section.
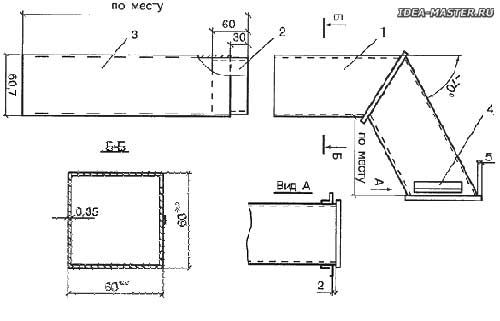 Fig. 14. Exhaust pipe: 1 — L-shaped knee; 2 — insert; 3 — straight knee; 4 — aluminum corner 10x10x0.35 mm. |
These grooves include the edges of the cutout of the flap covering the vent in the wall (the flap is pressed against the wall with a wooden wedge, as shown in Fig. 2).
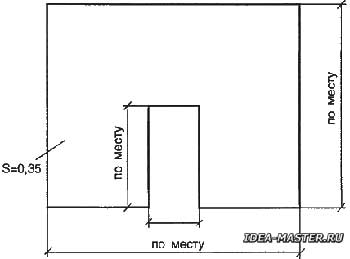 Fig. 15. Duralumin leaf flap. |
Figure 15 shows the design of the flap. The cutout of the flap is best done locally, that is, after the manufacture of the L-shaped section of the exhaust pipe. It is clear that it is difficult to make a bent pipe exactly according to the specified dimensions.
Tin works in the manufacture of a smokehouse
In the manufacture of cooler pipes, stoves and exhaust pipes, I connected sheet metal parts with bent seams (folds). Tinsmiths have their own names for these seams. But I forgot them, and to be honest, I didn't know. Therefore, when telling how I worked as a tinsmith, I will use my own terminology. I do not know if I did the seams correctly, but they turned out to be strong and reliable. So tips for DIY makers will surely come in handy.
Fig. 16 shows the stages of joining the edges of two sheets or one sheet of metal with a fold, which is necessary, for example, when making a bucket. At the edge of the sheet, a 4...5 mm high edge is bent. As much as possible, as little as possible. The size depends on the thickness of the sheet. In our case, the thickness of the sheet is 0.5 mm. In sheet II, the edge is also bent, but twice as high, and then the edge of this edge is bent to the left (the width of the fold is 3...4 mm). As a result, the edge of sheet II will look like the letter G on the contrary (Fig. 16, a). The edges of sheets I and II are shifted close to each other, after which the upper edge of the L-shaped bend is bent downwards with light blows of a mallet or hammer so as to grasp the curved edge of sheet I. After that, the seam is sealed with pliers (Fig. 16, b). With light blows of the mallet in the direction indicated by the arrow, the seam is bent in several passes, and then sealed on the mandrel until it takes the form shown in Fig. 16, B. The question arises, why is it necessary to bend and seal the fold shown in Fig. 16, b? Fig. 16. Formation of a fold when connecting two sheets (two edges of one sheet). |
When we make any container (jar, bucket, watering can), the upper edge of the container turns out to be sharp, and the container itself does not hold its shape well. To get rid of the sharp edges of the walls, they should simply be bent in any direction, forming a rim with a width of 4...5 mm on the edge. And to give the top of the container sufficient rigidity, it is reinforced with a wire ring. How to do this is shown in Fig. 17. First, for several passes on the upper edge of the container, the edge is bent. The width of the edge depends on the diameter of the wire from which the ring is supposed to be made. The desired edge width is calculated by the formula: S=Nd, where N is the number 3.14, and d is the diameter of the ring wire. The edge of the edge is bent (Fig. 17, a), after which the end of the wire is brought under the edge (Fig. 17, b) and the edge is crimped with pliers at this point, fixing the end of the ring wire under the edge. Next, we lay the wire under the edge around the container, bend the edge with pliers in several places and cut off the extra end of the wire so that the ends of the ring close. Now, with the blows of the mallet, we gradually bend the entire edge around the reinforcing wire. However, it is not possible to completely compress the wire with an edge with a mallet, so it is necessary to bring the crimping with pliers (Fig. 17, c). It is better to tap the ring roller formed on the mandrel from inside the container, carefully compress it again with pliers. For greater strength and durability, the bend joint can be soldered.
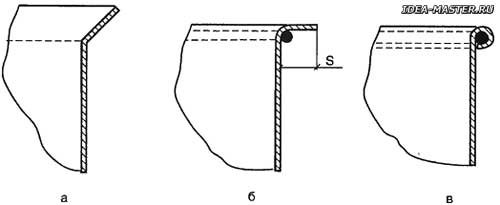 Fig. 17. Sealing of the wire ring. |
The method of connecting two sections (elbows) of the pipe at an angle is shown in Fig. 18. First, the edges are bent at the mating ends of the elbows, one of which is twice as wide as the other (Fig. 18, a). Then a wider edge is given an L-shaped shape, bending a collar half the width of the edge along its edge. As a result, at the end of the knee, a sort of seat for the mating knee is obtained (Fig. 18, b). It remains to install another knee on this seat and compress the bent edge of the «other» knee with a collar (Fig. 18, c).
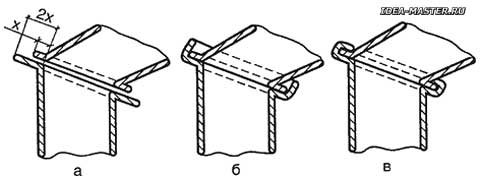 Fig. 18. Connection of two pipes at an angle. |
The bottom of a container is connected to the side walls of this container as follows (Fig. 19). The lower edge of the side wall of the container is bent with a mallet at a right angle, as described above, a container with a bent edge is mounted on a sheet of tin and an edge contour is drawn with an awl or needle along the outer edge of the edge on the sheet. Further, at a distance of 5...6 mm from the applied trace, another contour is applied and the bottom blank is already cut out along it. Along the inner contour on the bottom blank, the edge is bent so that a «frying pan» turns out from a flat blank (Fig. 19, a). The sidewall of the container is lowered into the «frying pan» (Fig. 19, b) and bent into 4 with pliers 5 places of the edge of the «frying pan» (bottom) on the edge of the sidewall (Fig. 19, c). After that, the bottom edge is carefully (in several passes) bent onto the edge of the sidewall with pliers and a hammer seal the seam on the mandrel. To increase the strength of the bottom fastening, the seam along the circumference can be bent again, as shown in Fig. 19, g.
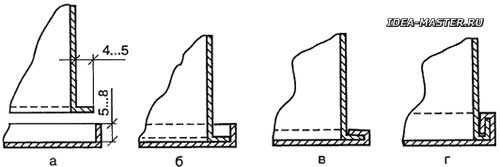 Fig. 19. Fixing the bottom of the container to its walls. |
This material about the manufacture of a smokehouse could be finished, but we will also tell you about the smoking of fish itself on the next page.
All materials of the section «Ideas for the master»
| Share this page on social networks: |

