Modification of the manual circular saw. Table-attachment for manual circular saw
Everyone who purchased a manual circular saw had the opportunity to make sure that, having a lot of advantages over a stationary saw (lightness, high specific power, lower cost, etc.), this tool also has a number of disadvantages (small table size, very wide slot for the output of the saw, extremely inconvenient for performing precise work, a restrictive bar, which is also fixed at one point, as a result of which it «plays» under load). Among other things, based on the experience of operating two saws (though not «Boshevsky»), I found that the limiting bar cannot always be installed parallel to the disk. In addition, the depth of the cut has to be adjusted, as a rule, by tilting the table, which causes certain difficulties. Especially when working with long-length material.
However, all these inconveniences will disappear if a set of manual circular saws is supplemented with a table-prefix of a simple design and the saw is attached to it from below with screws.
Table for manual circular
The drawing of the table as a whole is not presented in this material, since its design is quite obvious and is chosen by each master based on his own needs. So, the legs of the table are made rigidly fixed, removable, folding, or completely do without them. In the latter case, the console table is simply attached to any equally high objects (feet, bars, logs, etc.) with bolts or screws with countersunk heads, which is sometimes the preferred option for field work. The dimensions of the console table are chosen depending on the operating conditions and the tasks to be solved by the «sawyer». Usually these sizes range from 40x70 cm to 60x100 cm. Therefore, when talking about the design of the table, it makes sense to describe in more detail only some of the details of the table, and even then in a recommendation plan, since, based on your own capabilities, you can vary its design as you like.
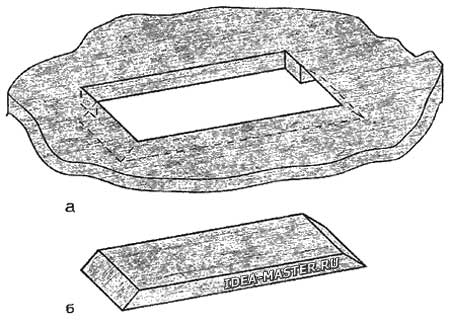
The most suitable material for the «tabletop» of the console table is a sheet of textolite (10 mm thick) or duralumin (6...8 mm thick). If it was possible to get only a thinner material for the table, the latter is reinforced from below with a frame of steel or duralumin corners on M4 screws M5. Having made the «tabletop», we install the saw on its back side, after which we mark and cut a slot in the «tabletop» for the passage of the disk. When forming a gap, you can drill a number of holes in the «tabletop» with a drill, and then process the edges of the slot with a hacksaw blade and a file. Or you can use the hand saw itself and, having fixed a disk with pobeditovy soldering on it, cut through the gap. The easiest way, of course, is to ask for help from a milling machine. I note that in order to preserve such a useful quality of a hand saw as the possibility of tilting the disk, the gap is made wide enough. With the usual perpendicular position of the disk, part of the slot is closed with an insert with bevels (Fig. 1), which is pressed against the «tabletop» with a regular saw table and held in the slot using the corresponding bevels on the short walls of the slot. Without such an insert, any more or less narrow material will necessarily fall into the gap. After the gap is formed, the saw is fixed on the back of the «countertop» in such a way that when the saw blade is inserted, it has equal gaps on the left and right, as well as in front and behind the walls of the gap. In the standard table of the saw, holes with a diameter of 5.1...5.2 mm or 6.1...6.2 mm are pre-drilled at the corners for bolts M5 or M6, respectively. According to these holes, holes are drilled in the «tabletop» of the console table, after which the holes are countersunk on the front side under the countersunk heads of the fixing screws.
 Fig. 1. Slot (a) in the «tabletop» for the passage of the saw and insert (b). |
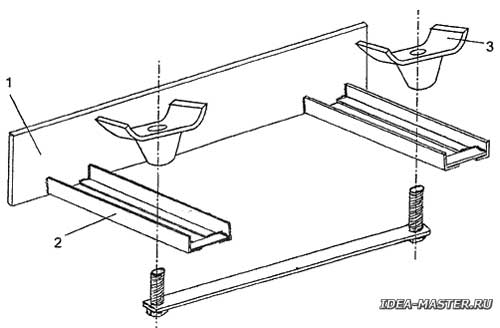
The limiting bar (Fig. 2) consists of the bar itself (a steel strip 3...4 cm wide and 3...4 mm thick) and guides welded from 10x10 mm steel angle segments. The bar with the guides is also connected by electric welding. The limiting bar is fixed on the «tabletop» with two M6 bolts welded to the ends of the steel strip and two wing nuts. For bolts in the «tabletop» you will have to drill holes. When making a restrictive bar, it is important to observe the parallelism of the guides, for this it is desirable to use a template from the cutting board during welding. (On my homemade circular, I use an aluminum corner with shelves 40 mm wide as a restrictive bar. The length of the corner corresponds to the length of the «countertop». I fix the corner on the «tabletop» with the help of two clamps, which I attached to the corner with M5 screws. And to make it easier and faster to install the bar in the right position, I applied parallel risks on the «tabletop» every 0.5 cm. — Editor's note.)
 Fig. 2. Design of the restrictive bar: 1 — the actual bar; 2 — the guide; 3 — the lamb nut. |
For the convenience of work, and most importantly, for safety, the console table is equipped with an extension cord with a socket and a switch, which can be performed both manually and in the foot version. When the saw is switched on and off remotely, the work is carried out with a clamping bracket permanently put on the saw key. At the same time, there is no need to constantly remove this bracket from the saw and install it on the saw, which, even if the saw has a protective casing, is a very unsafe procedure.
In conclusion, it should be added that it is generally possible to replace the regular saw stoic with a larger one, but this is advisable only if the use of the saw in the manual version is not intended, so that the proposed design is more versatile. In addition, the staff table is attached to the saw mechanism on rivets, so that such a modification would be, so to speak, not «therapeutic», but «surgical» in nature, which is undesirable.
The idea of a console table (the idea is actually quite obvious) was born in the process of «sabbath» work on the construction of houses, when in the presence of a fairly powerful, light and convenient manual circular saws had to carry with them a much bulkier, but less powerful stationary circular saw for the sake of performing a few «finishing» work (of course, a powerful stationary circular is not particularly something to drag on «sabbaths»!). Of course, someone who uses a circular saw infrequently should not even bother with a garden — it's easier to fix something with a chisel or plane, but if the circular is in business all the time, and even used as an object, as they say, «wearable», then such a master may like my offer, since convenience, accuracy and the safety of working on such a circular will become noticeable immediately.
All materials of the section «Ideas for the master»
| Share this page on social networks: |
