About log cabins. How to build a log cabin. Construction of a log house with your own hands
We are building a house «without nails». Log cabin construction
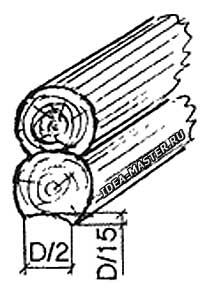 Fig. 1. Consolidation of logs in a log cabin with a round groove. |
The construction of wooden houses and outbuildings, as they say, «without nails» in Russia has been known since time immemorial. Due to the valuable building qualities of wood (low volume weight and relatively high strength), wooden structures are still widely used in house construction. After all, wooden structures made of appropriately treated wood and protected from moisture cost centuries.
To prolong the service life of wooden structures, wood treatment against rotting (preservation of wood) is used, which provides protection of open wooden structures for many years. Against fire danger, wood is treated with flame retardants.
Good thermal insulation properties of wood contribute to its wide application in the enclosing structures of buildings. Log cabin has long served as the main structural form for residential buildings and other buildings. With the development of sawmilling , cobblestone walls began to be used.
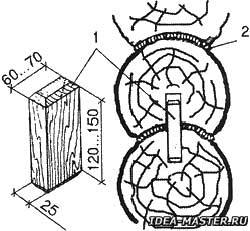 Fig. 2. Logs in adjacent crowns are connected additionally with insertion spikes: 1 — thorn; 2 — layer of tow (moss). |
Logs with a diameter of 16 to 30 centimeters are used for cutting the walls of huts. Each row of logs in a log cabin is called a crown (the lower crown is a salary). In two crowns adjacent in height, the logs are laid in lumps in different directions and joined together using cylindrical (round) grooves (Fig. 1). The crowns are laid in grooves downwards. Tow or moss is laid in the grooves between the crowns.
To prevent lateral shifts of logs, adjacent crowns are connected with insertion spikes with a cross section of 25x60 mm and a length of 120...150 mm (Fig. 2), which are arranged in 2 m increments (staggered over the wall area). In the piers, the spikes are placed one above the other at a distance of 10...15 cm from the opening. The depth of the nest under the thorn is made 2...3 cm longer than the length of the thorn (calculation for landing). The places of splice of logs along the length are placed at random. The types of splice of logs and beams are shown in Fig. 3. Note that splicing into half a tree (Fig. 3, a and b) «works» only on crumpling, with an end-through frying pan (Fig. 3, c) — for stretching and shear, with an end blind pan in half a tree (Fig. 3, d) — for stretching, shear and bending, with an end ridge (fig. 3, d) — for lateral shear.
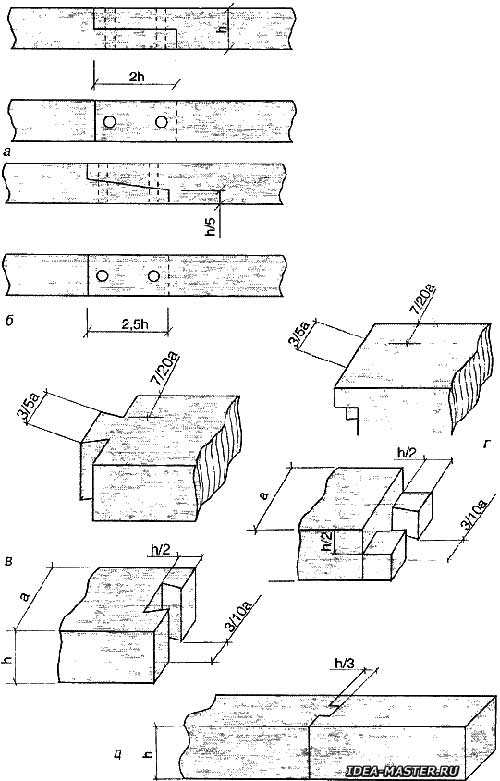 Fig. 3. Types of splice logs: a — in half a tree with a straight joint; b — in half a tree with an oblique joint; c — with a through end frying pan; d — with a blind end frying pan in half a tree; e — with an end comb. |
To prevent bulging of the wall and to give it additional stability, if necessary, vertical clamps made of two bars tightened with bolts are placed on the wall (Fig. 4).
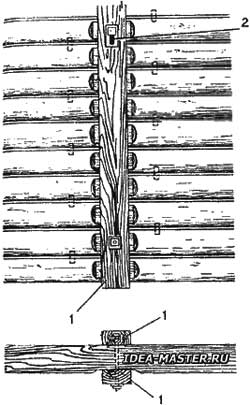 Fig. 4. Wall compression device: 1 — bars with a cross section of 16x18 cm; 2 — bolt. |
The clamps are usually located at a distance of 6.5...8.5 m. Well, if you want to do without nails at all, that is, without metal, then shorties are cut into the walls during their construction, acting as a kind of buttresses.
Chopped (log) houses are made of roundwood of coniferous (better) and deciduous (worse) species. At an estimated winter air temperature of up to -30 °C, houses are cut from logs with a diameter of 22...24 cm, and at temperatures below 30 °C — from logs with a diameter of 26 cm or more. The thickness of the inner walls is usually 2 cm less than the outer ones.
The logs of the log house are laid in horizontal rows and connected in the corners with cuttings with a remainder («in the oblo») and without a remainder («in the paw»).
When the logs of the crowns are paired «in oblo», a notch (cup) is made in the shape of the lower log in the log located on top. To create a tighter and more reliable coupling in the cup during its formation, a «secret» spike is provided (Fig. 5, a). Mating the logs of the crowns «in the paw», often for the same purpose provide a «root» spike, placing the latter close to the inner corner (Fig. 5, b). It is clear that if a spike is formed in one of the mating parts («secret», «root»), then a groove is provided for the spike in the other.
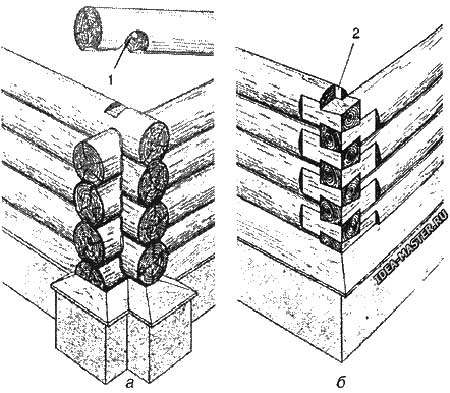 Fig. 5. Cutting the corners of log walls: a — «in the oblo»; b — «in the paw»; 1 — «secret» thorn; 2 — «root» thorn. |
As already mentioned, the logs of adjacent crowns are connected to each other in a groove and a ridge. I repeat, in order to avoid rainwater flowing into the seam, a groove is chosen in the lower part of the log (see Fig. 2). By the way, the groove serves not only for the logs to be tightly adjacent to each other in height, but also to increase the air tightness of the walls. The lower crowns are necessarily treated with antiseptic, waterproofing is laid on the foundation from two layers of roofing material. As the logs are laid, the horizontality of the crowns (level) and the verticality of the corners and walls (plumb) are constantly checked.
Ceiling beams are cut into the outer walls with a frying pan, and into the inner walls with a semi — frying pan. Fig. 6 shows the types of conjugations of logs and beams at right angles (for simplicity, only the conjugations of the beams are given).
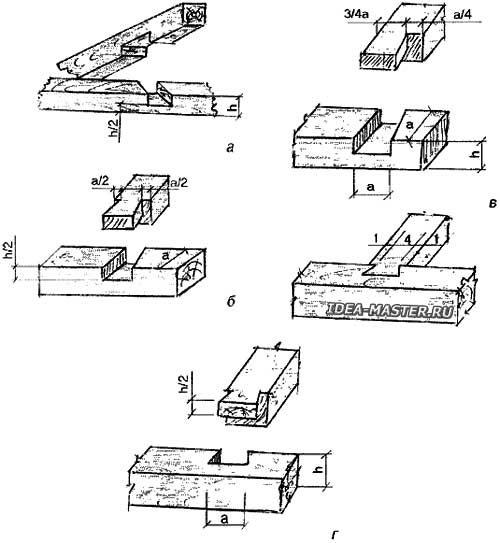 Fig. 6. Types of coupling of beams (logs) at right angles: a — in half a tree; b — through a frying pan; c — through a half-frying pan in half a tree; d — a deaf frying pan in half a tree. |
At the end of the assembly of the walls, the openings of windows and doors are cut into them (along the plumb line) and installed in the openings of the boxes, which must be connected to the walls in a groove and a ridge. The seam is then caulked and closed with platbands.
Bars for the wall cobblestone houses are made of coniferous wood. For external walls at temperatures up to -30 °C, bars with a cross section of 150x150 mm are suitable, and at temperatures up to -40 °C — with a cross section of 150x180 mm or 180x180 mm. For internal walls, a beam with a cross section of 100x150 mm is suitable. In the corners, the bars are assembled in half a tree, «in the paw», on the dowels, by joining the ends of the bars in a staggered order. Some types of angular conjugations of bars are shown in Fig. 7.
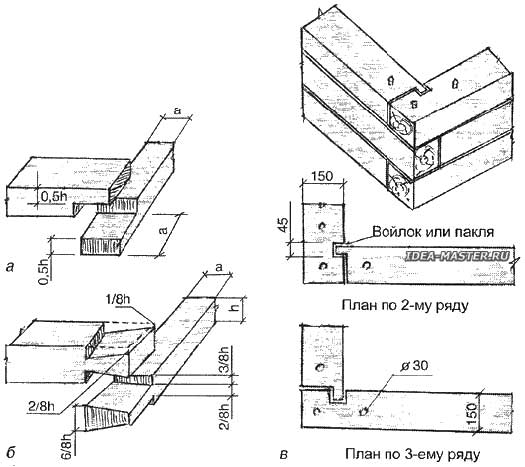 Fig. 7. Angular joints of bars: a -— in half a tree; b — «in the paw»; c — with a pruning and a side comb. |
In order to avoid bulging of the walls, the bars are fastened in height with wooden nagels (round spikes) with a diameter of 25...30 mm, placing them in 1.5 m increments in a staggered order over the wall area.
Due to the precipitation of the building, the walls and corners of log houses are caulked, plastered or covered with boards for the second time 1...2 years after the completion of construction. It must be remembered that in chopped and cobblestone walls above the boxes of windows and doors, gaps are left for a draft of 1/15...1/20 of the height of the opening. When laying the foundation, it is necessary to take into account that the level of logs and beams in the crowns of the transverse walls differ from the level of logs and beams in the crowns of the longitudinal walls by 1/2 the height of the crown.
In the log and brick walls, the floor beams are cut between the logs (beams) of two crowns. The device of rolls, partitions and similar works are carried out only after the roof is installed and the side planes of the beams are treated with antiseptics. During the construction of a log house, mineral wool, granular slag, calcined sand and other backfills are used as thermal and sound insulation materials.
Rafters in chopped houses are usually made of boards, connections of elements in nodes are carried out on cuttings with additional fastening of elements with steel ties (staples, linings, clamps). Although in this material we promised to talk about building a house without nails, it is difficult to do without metal here.
The depth of the inset in the frontal cuttings is not more than 1/3 of the height of the element, the length of the cleavage plane is not less than four times the depth of the inset (but not less than 20 cm and not more than 26 cm). The working planes of the cuttings and joints should be tightly clamped to each other. Partial small «millimeter» leaks (gaps in the seams of cuttings and joints) are allowed. It is clear that the design of the rafters (slopes, sections, nodes) depend on the specific type of roof. Fixing the roofing flooring or crate is carried out with nails (here, as they say, you can't get anywhere).
But the floors, if desired, are not very difficult to lay without the use of nails (this was done in the old days in Russia). Floorboards with a thickness of at least 60 mm, prepared for joining (joining) into a quarter or sheet pile, were laid directly on the beams (or, as they were called, busting). In this case, ordinary edged boards were necessarily connected to each other with spikes made of solid wood (usually birch, maple, beech, oak).
Ceilings were also previously executed without a single nail. For such ceilings, special ceiling beams (matrices) of T-shaped cross-section were prepared, and they were made by cutting or sawing out of a solid beam, rather than nailing side bars to the central beam. And thick boards, at least 40 mm thick, were laid on these side protrusions, connecting them into a quarter or tongue. Naturally, the matrices and boards were rounded off from the side of the hut.
From the attic side, a layer of clay with a straw section was applied to the ceiling, and then the insulation was laid.
Techniques and methods of wood processing (sawing, planing, cutting, chiseling, drilling, etc.) and the tools and devices used for this, as well as the technology of manufacturing individual components and parts of the house, are not covered in this article, because this is a large and independent section of wooden architecture. But the designs of individual nodes and some types of interfaces of the main wooden elements that are present during the construction of a house «without nails» are given here.
All materials of the section «Repair and construction»
| Share this page on social networks: |
