How to glaze the balcony yourself. Making frames for balcony glazing with your own hands
Frames for glazing balconies and loggias
The need for glazing loggias and balconies of houses in large cities is now obvious. Due to the unfavorable environmental situation (especially under the influence of acid rain), the flooring of loggias and balconies is destroyed, intense corrosion of metal reinforcement panels occurs. It is no coincidence that the Moscow Government favourably treats the activities of numerous companies offering balcony glazing services.
After all, as a result, the microclimate in the apartments improves, there is less dust there. We also note that in the glazed volume of the balcony the temperature is several degrees higher than on the street, that is, heat loss from the apartment decreases. By the way, the presence of windows at the balcony (loggia) will protect the owners of balconies from extremely unpleasant consequences associated with accidental ingestion of cigarettes and cigarettes, especially during the period when poplar fluff flies.
Manufacture of frames for balcony glazing
Options for self-glazing of the balcony, associated with the use of any ingenious sliding sections, seem obviously unsuitable: there will be a lot of hassle, but little use. The most reasonable option is to install and fix the same type of frames in the glazed opening. Now frames of standard sizes are easy to buy in the store, frames of individual sizes are readily made in the workshop, but it is cheaper to make the frames yourself. But in any case, before manufacturing (purchasing) it is necessary to measure the frame and draw the contour of the opening of the loggia, which is to be closed with glass.
Do not despair if you find that the dimensions of the opening in height «play». This is a common story. After all, in construction, the main measuring unit is a meter, and its hundredths are, so to speak, structural tolerances. To meet a builder with a barbell in his pocket is as ridiculous as to see a turner measuring the diameter of a part with a tape measure.
When choosing the dimensions of the frames, keep in mind that the width of the frames should ensure that the glass is washed manually, that is, this width should be no more than 70 cm. Then we select those sections of the frame that we fix rigidly on the frame of the glazed opening, of course, we will also provide transoms, as well as outline the opening frames necessary for ventilation of the room and washing the glasses of fixed frames. For safety reasons, they provide that the frames open inside the balcony.
For the manufacture of frames, the most affordable and at the same time quite durable material is coniferous wood: bars with a cross section of 45x45 mm or planed boards with a thickness of at least 40 mm, from which we will cut the necessary bars. It is clear that it is desirable not to buy the material for the bars, but to make the last of the waste thrown into the trash. Of the suitable waste, the most valuable are the details of the door frame, which the «new Russians» usually throw into the landfill after installing steel doors. Over the winter, it is quite possible to prepare material for the desired number of frames.
Cutting boards into bars is carried out in any way: on a circular saw, an electric jigsaw, a longitudinal hand saw. A quarter with a size of at least 15x15 mm, necessary for the installation of glasses, is selected in bars with a countersink, an electric pipe or with the help of a circular saw in bars. Fig. 1, a shows the cross-section of the frame binding bar (the dotted line indicates the initial section of the door frame rack from which this bar was cut). The slats formed as a result of sampling the quarters on the circular, we will save in order to use them in the future to fix the glasses in the frame. To facilitate the work, you can do without sampling quarters by providing the frame bars with linings made of slats with a thickness of 10...12 mm. The pads are attached to the PVA glue and nails so that a semblance of a quarter is formed (Fig. 1, b).
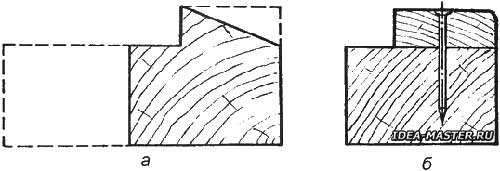
Fig. 1. Options for making quarters under glass:
a — the finished sample in the bar (the dotted line indicates the contours of the section of the bar of the door frame from which the bar was cut); b — the installation of the rail-lining.
Of course, such frames are easier to make, while their durability is quite sufficient for our purposes. Connect the bars of the frame binding with a straight through single spike (Fig. 2). Gluing the bars of the frame binding is carried out only after fitting it to the appropriate place in the opening. Having lubricated the spikes and eyelets of the bars with glue, assemble the frame, additionally fixing the angular connection with a wooden nail — nagel, driving it on the glue into the hole. The finishing treatment of the frame surface is carried out with a plane after the glue has dried. If desired, the corners of the frame can be attached with screws to the corners of the frame to make it more rigid (see Fig. 2).
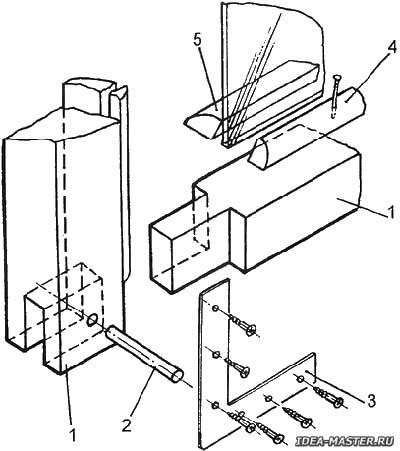
Fig. 2. Frame angle connection:
1 — frame bars; 2 — nagel; 3 — patch square; 4 — rail-bead;
5 — rail-overlay.
Returning to the topic of using waste for the manufacture of frames, we note that a wooden frame from a sofa or mattress, scheduled to be «written off» from household utensils due to the wear of the upholstery and springs, can serve a good service here. If the boards of the frame are wide (at least 80 mm), it is pre-«split» with a hacksaw or jigsaw, getting blanks for two frames at once (Fig. 3).
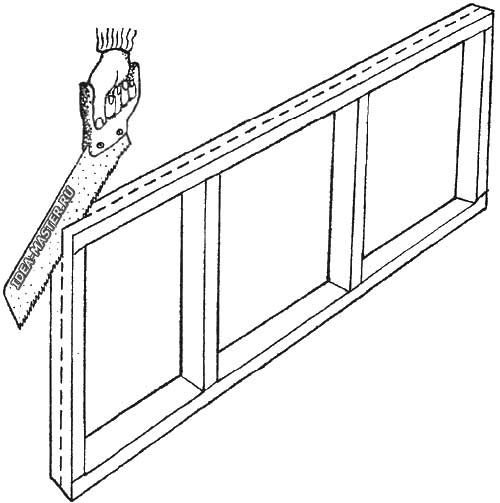
Fig. 3. By sawing the frame from the sofa lengthwise, you can
get blanks for two frames.
Note that some uncultured, unconscious or careless residents of your house living on the upper floors may drop or even afford to throw away an object that, when planning, is capable of breaking the glass of your loggia. Therefore, it is advisable to provide the frames with additional cross-links, which will reduce the size of the installed glasses. And the glass is smaller and stronger, and costs less, and it's easier to replace it. (If possible, it is easy to tie the geometry of the frames to the available sizes of waste glass at a discounted price.)
When ordering frames in the workshop, be guided by the maximum dimensions of the frame in height, since in this case it will be easier to fit them in place. And ask the frames not to glue. After all, it is more convenient to transport the frames in disassembled form (the frame details must, of course, be marked).
Installation of frames in the opening
In practice, the method of fixing fixed frames to the metal edging of the glazed opening has proven itself well (Fig. 4). At the top and bottom, the frame is attached to the corners of the edging with screws with a diameter of at least 4 mm passing through holes in the frame. In the area of the opening frames, the presence of transoms is desirable, which are attached to the edging and fixed frames also with screws.
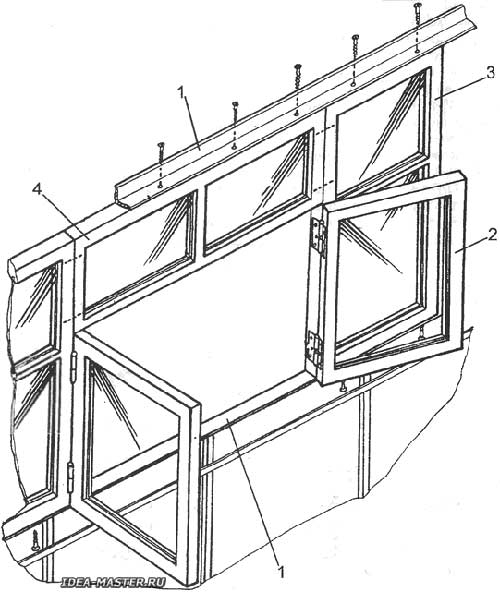
Fig. 4. Fastening of frames to the edging of the balcony, made of metal corners:
1 — the corners of the edging of the opening; 2 — an opening frame; 3 — a fixed frame; 4 — a transom with a king.
When fixing frames in a concrete (or brick) opening, it is convenient to use furniture corners with fasteners, screws and dowels (Fig. 5). The suspension of the frames being opened is made on detachable, so-called card hinges with a length of 75...100 mm, attaching them with screws to fixed frames. With such hinges, if necessary, the frame is easy to remove. To eliminate the cracks at the junction of the movable and fixed frames, put the slats.
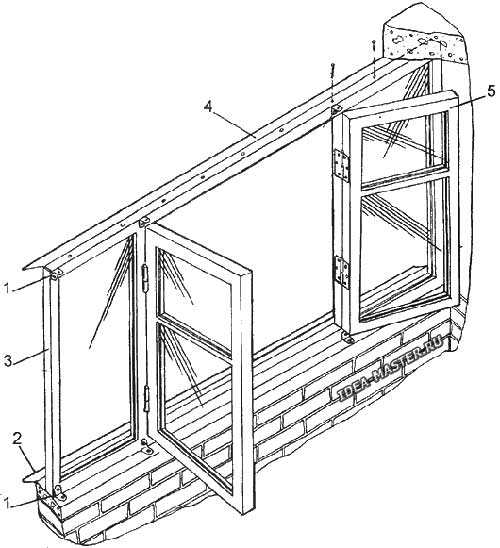
Fig. 5. Glazing of the loggia with concrete walls:
1 — mounting corners; 2 — lower visor; 3 — fixed frame;
4 — upper visor; 5 — opening frame.
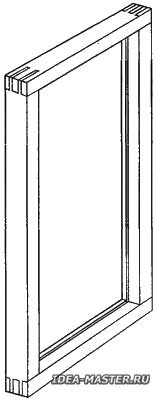 Fig. 6. Window box. |
Of course, it is best to strengthen an ordinary window box consisting of four bars with folds in the opening intended for glazing (Fig. 6). And already in this box to fasten frames and transoms. There will be plenty of fuss with the window box because of its considerable size. But the glazing of the loggia will be done professionally and you will not have to deal with additional sealing of possible cracks.
The wind load on the frames can be quite significant, and therefore the opening frames must be provided with strong latches, installing them from above and below.
Before installing the frame, it is putty, sanded and painted with high-quality paint. Frames covered with drying oil or varnish look good for a very short time, because under the influence of the environment, the wood turns black and loses its original appearance. Good results are obtained by processing frames with Pinotex.
Glass installation
Fixed frames are glazed after their installation, having previously eliminated possible distortions and finally fixed. A temperature gap of 2...3 mm is provided between the frame and the edges of the glass, which is filled with plastic window putty. When ordering glass in the workshop, it is useful to prepare templates (made of cardboard or hardboard) according to the size of the glasses, according to which the glazier will accurately cut out this or that glass. If the glass turned out to be a little too big, the easiest way is to trim the frame with a chisel. Fasten the glass in the frame either with nails, or (which is better) with beads — thin slats, nailing them to the frame with small nails.
When glazing large openings, it is preferable to combine unopened frames in the form of oversized sections.
To seal the cracks in places where the frame parts are loosely adjacent to the walls of the opening, we recommend using the commercially available special foam of the «Macroflex» type, which is allowed to be applied to the wet surface of metal, wood, concrete. They work with this material in rubber gloves, since the «Macroflex» is practically not washed by hand. After application, the foam increases in volume by three times, so that when solidified, it reliably fills all voids.
In the section «Repair and construction»
| Share this page on social networks: |
