Homemade flashlights. How to make a flashlight from a medical syringe
This article is about homemade flashlights.
«Why?» — you ask.
Indeed, the flashlight is easy to buy in the store. But is it worth going to the store and spending money? I am a student myself, I live in a hostel where, due to constant problems with electricity, the lights are turned off every now and then, and at the most inconvenient time (in the mornings, when it is not yet dawn, and in the evenings, when the sun has already disappeared below the horizon).
So, because of these interruptions, plus because of the stolen light bulbs from the stairwells (a familiar picture, isn't it?), it becomes dangerous to walk along the entrances at night. Moreover, this problem is not only in dormitories, but also in ordinary multi-storey buildings. It often happens that returning home from school (work), you find that there is no light in the entrance. Then you have to climb the stairs in pitch darkness. And God forbid, you stumble here. Falling on the dirty steps, you are sure to drop shopping bags, the contents of which roll out on the floor. It remains, secretly envying the cat, who can see in the dark, by touch to look for scattered, loudly expressing his dissatisfaction either to the scoundrels who stole or broke the light bulb, or to those who turned off the electricity. But, as they say, «For three years the grandmother was angry at Kiev, but Kiev did not know», and in our case, somehow collecting things, you continue your journey with a sediment on your soul and ladder dirt on your hands.
Of course, this can happen only once, or maybe not once, but is it worth the risk? So, to prevent this from happening in your life (and in the lives of your loved ones), you should prepare for this in advance by getting a flashlight.
Of course, as I said earlier, it's easiest to buy a flashlight in a store, but it's quite expensive and also not quite suitable for our purpose. The fact is that the beam of light that an ordinary flashlight emits is too narrow to illuminate a sufficiently large area around itself. A flashlight with an adjustable beam of light is much more expensive, and its dimensions are larger. It is clear that it is not very convenient to carry a dimensional thing in a pocket or bag.
We need a way out, but what is it? Carry a candle with you? Yes, there is enough light from it, but matches will be needed, the candle goes out in a draft, an open fire is not desirable from a fire point of view, besides, it is at least not modern to carry a candle with you.
 Fig. 1. The simplest flashlight. |
So, there is nothing left to do but to make a flashlight yourself. I will offer two designs: one of them is inspired by childhood, when lanterns were in short supply, but all the guys wanted to climb attics and basements; the other is a modern figment of my imagination and hands.
The design of the flashlight No. 1. The simplest lantern is assembled from a small electric bulb, a «square» battery (4.5 V) and a piece of insulating tape. We fasten the bulb to one of the contacts with duct tape, leaving the end of this contact free (Fig. 1). By clicking on the other contact, you close the circuit, the bulb is lit, and you go up (down), you can see everything. Everything okay? No, one drawback has remained unresolved — the dimensions. Whatever you say, the size of the resulting flashlight is too big. I would like to reduce them to the size of the so-called «finger» (R6) battery.
Flashlight from... syringe
Construction No. 2 turned out to be more miniature. It is known that any lantern consists of three main parts: a light bulb, a galvanic cell and a switch. And in the case of the «finger» battery, another case was needed, because you can't do with one tape here, as in the first case.
The case for the flashlight had to be searched for a long time. The problem was further complicated by the fact that being in a communal environment, I did not have a box at hand where I kept all sorts of «junk» at home. In search of a suitable plastic tube (the latter is both lighter than metal and has insulating properties) of a suitable diameter, I climbed the whole room, but I didn't find anything. Because of this, I almost gave up my idea. But fate did not let my project die when it brought me to the pharmacy for some reason. It was there that I found what I had been looking for for so long, namely an ordinary disposable syringe.
The saleswoman was very surprised when I asked her to show me all the available exhibits. Of the four syringes offered, I chose the one that turned out to be the most suitable. It cost some pennies, so this purchase didn't hit my pocket. By the way, so that you don't get into a somewhat uncomfortable situation, like I did at the pharmacy, I inform you that the capacity of the syringe needed for our purpose is 10 ml. Its inner diameter of 16 mm was perfect for my idea.
 Fig. 2. Modification of the syringe piston. |
First, I cut off the protruding «cone» on which the needle is put on. Then, with a knife (preferably, of course, with a drill of a suitable diameter), he «drilled» a hole in the bottom in the center for the base of the light bulb. The exact dimensions are not needed here — the hole is expanded until the light bulb begins to screw into it, holding there firmly enough. As a result of these operations, a large hole was formed in the bottom of the syringe, and a small one was located next to it — from the «cone» that we cut off at the very beginning. If for some reason a small hole has not been preserved, do not worry and make yourself a small through incision with a knife in the bottom next to the large hole so that a thin wire from a telephone cable enters the formed groove (such wires are also called «colored wire» because of the insulation painted in different colors).
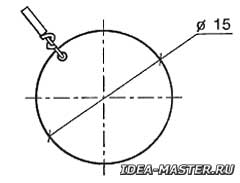
 Fig. 3. The easiest way is to tie the wire (fasten) to the disk. |
Now we remove the plunger from the syringe and cut off its conical surface with a knife, as shown in Fig. 2. After that, attach one end of the «colored wire» to the piston. I suggest the following method. We cut out a circle (disk) with a diameter of about 15 mm from tin from a tin can (a penny coin will do), make a hole in the circle with an awl near the edge, in which we fix the bare end of the insulated wire (the wire can be soldered or simply screwed, as shown in Fig. 3). Next, we glue the tin disc to the trimmed surface of the piston with some kind of «superglue» or epoxy resin. The disk is also attached to the piston with the help of tendrils, which are cut out together with a circle and when the latter is installed on the piston, they are bent.
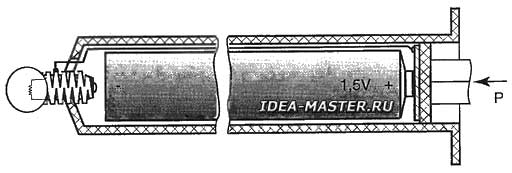
The other end of a piece of «colored wire», previously stretched inside the syringe body and brought out through a small hole, is either soldered; or tightly wrapped around the lamp base. To do this, the wire should be 4...5 cm longer than the syringe. It is clear that the last «operation» with the wire is carried out by inserting a battery into the case. We assemble the parts and get something similar to the structure shown in Fig. 4. Turn on the lamp by pressing the piston, it turns off by the reverse action. The free stroke of the piston is about 1 cm, which is quite enough for switching on and off flashlight. So, in general, the lantern is ready. Throw it boldly into your bag or pocket — it won't take up much space, but it will provide invaluable help.
 Fig. 4. A simple homemade flashlight in a syringe case. |
Now let's sum up how much it cost us. Not counting light bulbs and batteries — «mere pennies» for a syringe. How long did it take to «make it?» The maximum is 20 minutes. Conclusions suggest themselves.
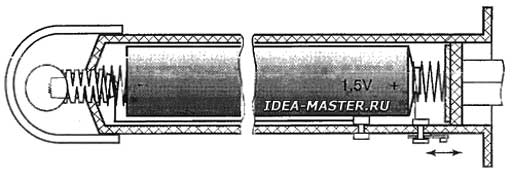
That's all I wanted to say about the flashlight. I think that this idea will not be without continuation and one of the readers will improve it if he needs it (for example, he will make a waterproof case or a shock absorber that will soften the impact of the battery on the light bulb in conditions of intense wear, or adapt another switch). A variant of a more convenient flashlight design is shown in Fig. 5.
 Fig. 5. Improved design of the flashlight in the syringe housing. |
Well, I'm saying goodbye to that. Goodbye, good luck in your work.
From the editorial office. Unfortunately, the author did not explain what he did with the handle of the syringe plunger — it's quite long. Then, the battery of the flashlight shown in Fig. 3, when the light bulb is turned off, will hang out in the syringe body. Yes, and the switch device (see Fig. 5) somewhat unclear.
All materials of the section «Ideas for the master»
| Share this page on social networks: |
